Showing posts with label water. Show all posts

Wednesday, 21 May 2014

How To: Make a Print Washer on a Budget

  Ah the early stirs of summer, the time when a man decides to re-open his toolbox and turns his mind to possibility.

  I'm tired of washing my prints in the kitchen sink.  It's just too small and i can't leave it alone because the prints sink to the bottom, block the tap; the sink fills and my kitchen starts to flood.  And woe betide me if i decide to print some 12 x 16 paper!


  Suffering from the same problem?  Lo, read on to see how you can make an inexpensive (really, it cost me about £20 in total) print washer.

  First off, materials.  Here's what you will need:

        • Plastic storage container (any size you like),
        • 2 x 2 metre lengths of plastic waste pipe (any diameter you fancy),
        • Some 90 degree joints that will fit your pipe (get about 8),
        • Hosing/tubing (approximately 2 metres),
        • Drill
        • Saw
        • sandpaper
        • Glue gun/silicon sealant
 So how do we build this washer i hear you cry?  Keep reading:

Step 1

  Grab your storage box (mine cost about £11 and can easily fit in 12 x 16 prints) and drill 2 holes roughly the same diameter as your waste pipe just an inch or so below the top of the container towards the left and right hand side.  To do this you may have to use a hole cutter (its like a round saw which you mount on your drill).  Unfortunately i didn't have a hole cutter the right size so i drilled my holes bigger.

Step 2

  Cut a small section off your pipe and feed it through the hole on your nearest side, push on a 90 degree joint (making sure you sandpaper down the edge you have just sawed) and then attach a vertical section of pipe which extends just shy of the base of the container.

Step3

   Now do exactly the same with the other hole, but this time saw the tip of the pipe at about 45 degrees to get a spout.


Step4

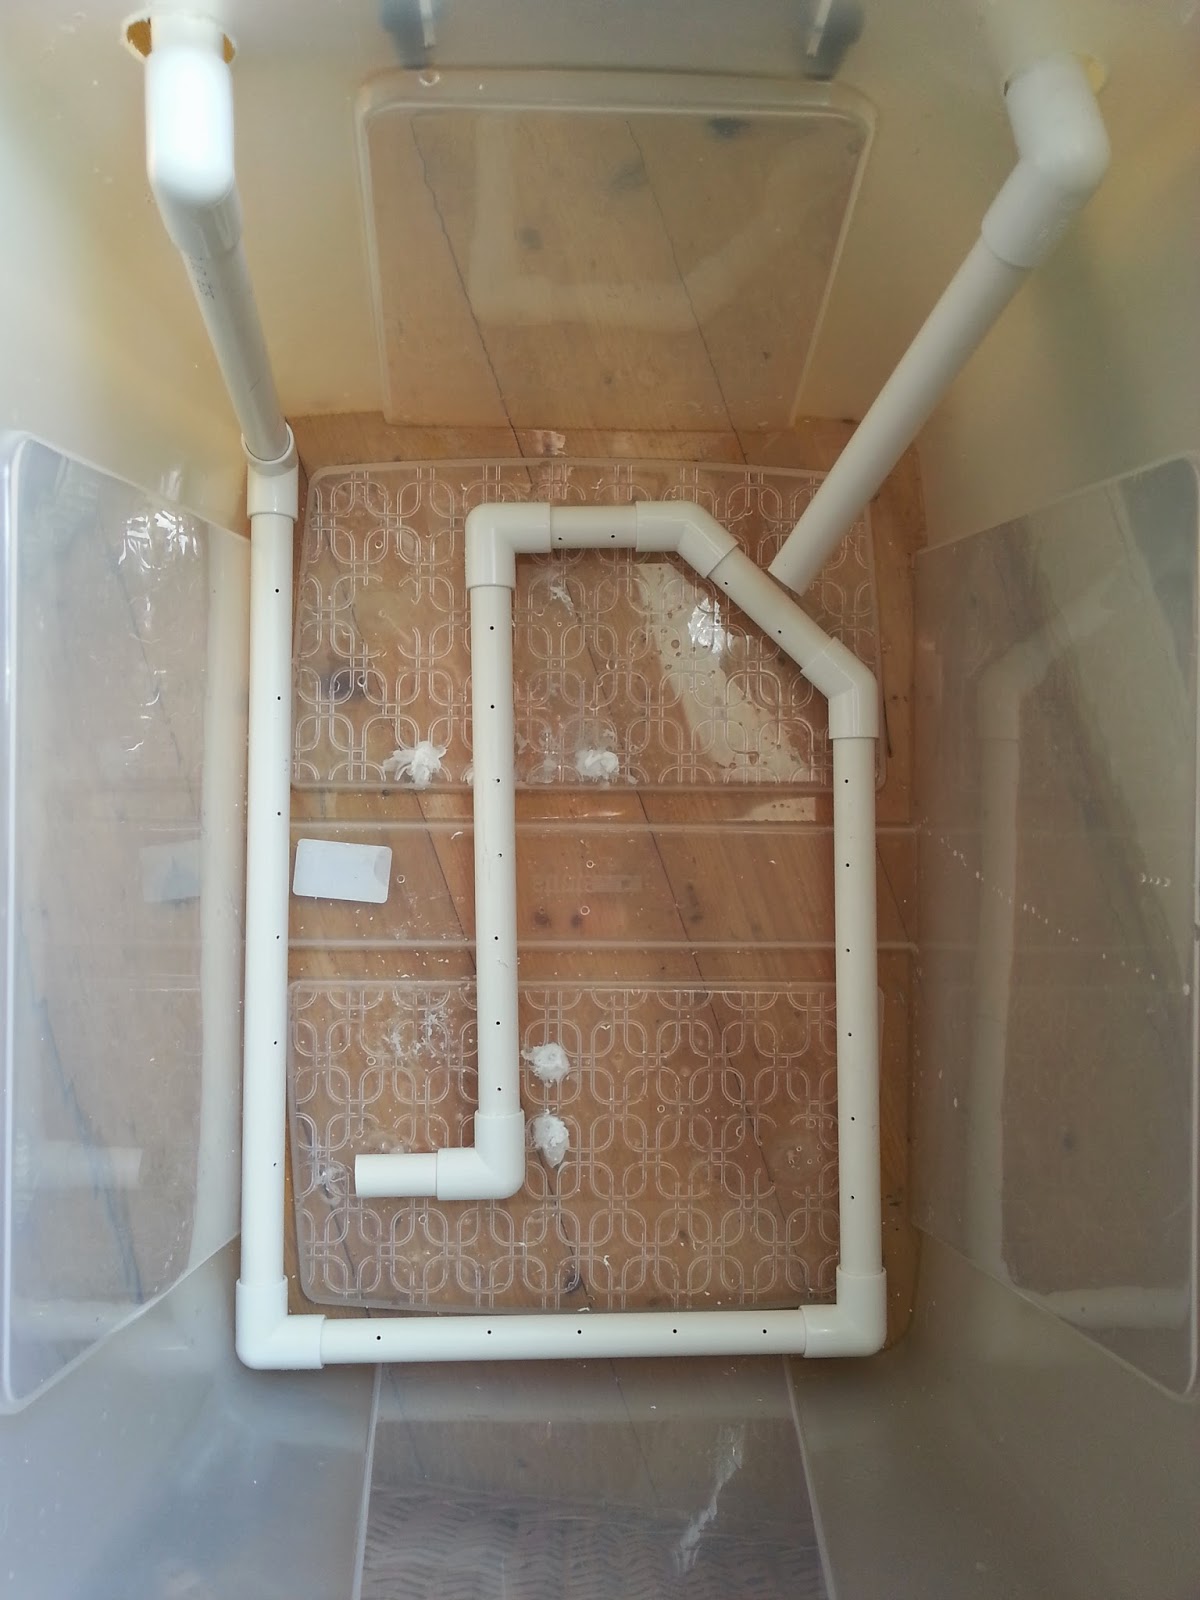
  Now go back to your first length of piping and measure along the base of your container then cut a length of pipe just a little less than the length you measured.  Smooth off the sawed edges of the pipe with sandpaper and attach it to the pipe you already have.

  At this stage i tried attaching a length of hose to cover the base of the container but it didn't quite work out.  Instead, keep attaching lengths of pipe and joints until you get good all round coverage along the base of the container.  You dont need to cap off the last piece, this will serve as an outlet for the water which flows through the system.

Not like this!

Like this!
Step 5

  Now take your drill and (using a small drill bit) drill holes every 2 inches or so apart along the entire length of the tubing which is sat in the base of the container.

Step 6

  Retreat to the bathroom (or wherever you're planning on setting up this washer) and check out your taps.  If you have the kind of taps you can just push hosing onto then all well and good, connect a length of hosing from the first piece of piping onto your taps.  This will mean water will flow in, down the vertical length and through the loop you have made in the base of your tub; flowing out from the last length to be picked up by the second vertical pipe which will act as a siphon.

  Now, my taps are mixers which means i cant push any hosing over them.  But, i can unscrew the shower and push the hosing onto the screw attachment (yay).

Like so!
Step 6

  Attach a length of hosing onto the second pipe and point it plugwards.  Turn your tap on and you should see water spurting out through the holes you have drilled and the container will start to fill.

  You should see some good agitation in the water as the container starts to fill (which is exciting isn't it).

Step 7

  Now, remember i drilled my holes for the pipe inlets bigger than the pipe?  I'm going to need to seal that up.  Take some plastic (e.g. from a bottle) and cut out a square which more than covers the holes you cut.  Cut out a hole as close to the diameter of the pipe as possible and use a glue gun or some silicon to attach the plastic to the container, with the pipe running through it.  If you don't do this then the water will just leak out of the holes you made and the second pipe won't act as a siphon.

Step 8

  Once that's all done you will have to ma the tap for a while to get the right flow.  Keep adjusting the amount of water coming out of the tap until what's going in matches what's heading out of the second pipe.  It helps to drill a small hole in the top of the second pipe and stick a match in it.  The match can be used to increase and decrease outflow.  Preferably you don't want the water to flow out over the top of the container.

Step 9

  The final step is to make something to support your prints.  It should be easy enough to source some acrylic or perspex sheets, cut them to size, attach them to some rods and put that in the tank.  As i already have a Paterson drying rack, however, i decided to use that.  These are cheap and come up relatively often on Ebay.


  And that's about it.  It's not the most hi-tech thing ever created but it's cheap and cheerful and should wash your prints sufficiently (i can't guarantee that of course).  It's certainly better than flooding my kitchen!

  The way it works is that the water flows in and goes through the loop at the base.  The drill holes allow water to spurt out which agitates the water, causing motion around the prints.  The water picks up the fixer and, as fixer-laden water is denser than clean water, it sinks to the bottom of the container.  It should then be picked up by the outflow pipe and siphoned out down the drain.  Science!  I haven't technically finished mine yet as i haven't sealed up the original drill holes so my siphon isn't really working but it will.  IT WILL I SAY!  Just for fun, here's a super-entertaining video of mine showing this mega-agitating washer in action (caution: may cause your mind to blow, it's that exciting):


  So that's it.  A print washer for those of us on a budget.  Those hundreds of pounds you have now just saved can go on something better like film, paper, chemicals or (woe of woes) rent!  As always keep printing and ill see you again soon.


Monday, 16 September 2013

No, No, No, No, NO, NO, NOOOO!!!


  I went out shooting at the weekend.  Which turned out to be a very bad idea.  A very very bad idea.  I discovered last week that a section of coastline not far from me had lots of wooden coastal protection.  Coastal protection = photographers delight so I decided to head out there on Saturday (along with Jess who, as it was sunny, decided to leave the house).  We had a lovely walk but alas it was too sunny and I only shot two frames.  The tide was a little too far out as well so there wasn’t really much to photograph as I was in a long exposure mood.

  I decided to head back at sunrise the next morning when the light would be a bit flatter and the tide would be all the way in.  I woke up Sunday morning wide awake, grabbed my gear and shot out of the house.  Half an hour later I was parked up and walking through the dunes, it was drizzling a little but I thought I’d endure, I could always run back to the car if conditions got worse.  I setup and shot 5 or so frames, keeping my eye on the tide as it turned out I had arrived just before high tide so the water was coming in fast.

  On the 8th or so frame as I was setting up the water came shooting in up the side of one of the coastal protection barriers and headed straight for my bag.  I ran back and snatched up my bag only to turn and see my camera ditch sideways into the sand. ARGH!  I ran back and up-righted the tripod to find my camera encased in grit.  I dusted it off and re-seated the tripod just as the tide came sweeping in again and half inundated my camera bag. ARGH AGAIN!  I ran back, rescued the bag and moved it further inland just as my tripod decided to blow over again and ditch my camera into the sea. 
AAARRGGHHHH!!  I ran back, rescued the camera and ran inland.  Well, the water had washed off the sand which was nice but water and cameras are never a good mix.  Fortunately there are very few electronics in my Bronica.  I grabbed my gear and decided to head home.  I split my SLR kit up and put it on the passenger seat of the car with the air blowers on full.

  When I got home I used a brush to dust off as much sand as I could and left the gear to dry.  It’s still drying now and every few hours I dust off any loose sand.  Handily the squeak on my 80mm lens has disappeared but alas my 50mm makes a horrible grinding noise when focusing.  It looks like no water got into the camera body or the film back which is a bonus; it’s just the 50mm lens that seems to have taken most of the damage.  Ill dry it and clean it as best I can but time will tell if any salt remains inside to cause any damage. 

  I decided to develop my film using PMK Pyro, praying that it would have some good shots on.  Alas, on removing the film from the tank it was almost transparent.  I’m not sure what happened, it looks like it didn’t develop fully.  My guess is the Pyro was dead as it was a very old stock solution, but I can’t be sure.  So now I am left with a potentially knackered camera and no pictures to show for it.  Damn.

But here’s what I learnt from my day of tragedy:


  1. heavy tripods are a wise investment
  2. sand and seawater do not compliment camera gear
  3. PMK Pyro solutions need to be used up quickly
  4. incoming tides move in rapidly
  5. cameras take a long time to dry out
  6. hats are useful for covering lenses
  7. it is hard to keep filters sand and water free when it is raining and you're on a beach


Hopefully you will learn a lesson from this tale of woe.  Keep your gear dry and avoid wet and windy beaches.  Right, message sent - i'm off tripod shopping...
 

Thursday, 12 July 2012

Rides, Reserves and Rodinal


  What better activity to do on a sunny Sunday afternoon than go on a lovely bike ride?  It was our first wedding anniversary earlier in May and one of the gifts i got my wife was an old Raleigh bike.  I stripped it down, sprayed it up, stuck a wicker basket on the front and re-assembled it.  I wasn’t sure how well it would go down with her as she had a nasty accident on a bike when she was younger and has feared riding ever since.  All credit to her she got out and now she loves it!  

  As part of the ongoing Guild celebrations in Preston the council have decided to create the Guild Wheel which connects new and old cycle paths around Preston to create a 21 mile ring of green and pleasant roadway.  Fortunately this wheel passes right outside our house so we decided to check some of it out.  

  We were having such a pleasant time that we went 4 miles and ended up at Brockholes Nature Reserve.  If you’re ever in the area it’s well worth a visit as there are lots of hides to watch wildlife and a lovely floating visitor centre and restaurant.  We parked the bikes up and had a little wander around – fortunately jess had brought one of her other anniversary presents, a Holga 120 CFN.  We had great fun pottering about and shooting a roll of Tri-X 400.  We had a drink and some Chorley cakes and then set off on the ride home.  After riding 8 miles we were pretty wrecked (due to general unfitness) and spent the rest of the evening working our way through the Lost dvd boxset (what the heck is going on on that island?!?!).

  Monday night after work i developed the film in Rodinal (i had to give a little push in development as i thought the film may be a little underexposed) for about 13 minutes and left it hanging to dry.  A couple of hours later we were in the darkroom getting ready to print.  We decided to work on 2 shots from the roll which make a nice little mini-set together.  After making some test strips we had figured out what exposure we wanted to work on and what dodging and burning was required.  An hour or so later and we had 2 prints that we were very happy with.  Jess loves to print and i must confess that there is something rather exciting about placing some paper in a tray and watching an image slowly develop.

  Were planning on going out again this weekend (weather permitting) so hopefully we will take some more shots and have a pleasant ride.

(The scans dont really do the prints justice i'm afraid)


Friday, 30 December 2011

A Holiday from Holiday

  For the first time since i left work last Friday i managed to get away from the family days out to do a quick hour of shooting.  I met up with one of my shooting pals Paul and we headed to Lytham/St Annes beach.  It was windy.  Extremely windy.  Tripod use was out of the question.  We headed down onto the beach hoping to head for the remains of the old pier but alas the tide was further in than i have ever seen it so we had to shoot from afar.  After spending some time messing with assembling my Bronica i finally got some shots in.  The tide was coming in at a ridiculously rapid pace and by the time i had setup my gear and eyed the shot in on my waist level finder i was stood in water.  Metering was a nightmare so i just used my instincts and shot.  I was a bit worried as the strong wind was battering our cameras with sand particles and blowing our gear bags all over the place.  We persevered regardless and shortly moved further up the coast where a flock of birds was sat on the water quite close to shore.  The local dogs chasing them proved to create some nice photo opportunities.


  Shortly thereafter i spotted a partially filled plastic bottle dumped on the sand which caught my eye so i snapped it.  It turned out to be one of the best shots on the negative.


  Our final stop was a little further up the coast where the waves were now smashing against the sea defences.  I sacrificed dryness to snap a few quick shots of the spray coming over the wall.


  The results were a bit hit-and-miss on the developed negative and some shots took a bit of work to get a decent image of but all in all i think they came out ok.  It was nice to be out in some extreme weather shooting on instinct rather than taking my time over each shot and meticulously recording every detail.

Saturday, 26 November 2011

SQ-A First Roll - Derwent Water

  Although i have posted shots from my Bronica already the shots below are from my first roll with my SQ-A.  The only reason they haven't been posted earlier is that i have only just got the chemicals in to develop them.

  My wife and i decided to head up to Maryport in the Lake District very last minute one Friday evening a month or two ago.  We had friends up there who said we could stay over and the plan was to get to Derwent Water near Keswick before dawn to catch some sunrise shots over the water.  Sure enough after 4 hours sleep there we were on the lakeside waiting for the sky to brighten.  It was a joy to use my SQ-A for the first time and i cant wait to get back up that way again for some more shots.  Tiring but fulfilling.