Showing posts with label bronica. Show all posts

Wednesday, 30 July 2014

Fortune

  I have had both good and bad fortune lately.  I thought things were really looking up when i found this stash of photo paper ridiculously cheap (i won't tell you how much i got it for because you will hate me forever and never read this blog again).  I saw an advert that someone was getting rid of some darkroom gear so i message them to see if they had any paper.  They said they had a few odds and ends so i took a punt and we arranged a price.  When the package arrived my head nearly exploded!  Inside was an almost full pack of 8x10 Fotospeed Lith paper, a pack of Oriental Seagull, a few packs of Ilford MGIV RC VC, a pack of Kentmere Fineprint VC, some Ilford MG FB WT in 9.5x12 and 12x16, a pretty full pack of Kentmere Art Document, Some Foma papers in 12x16 and a full pack of 16x20 and some Fotospeed Fotolinen which i haven't been able to find much out about yet.  And on top of that they sent me some unused Moersch Easylith!  What an absolutely fantastic bundle to get in the post!

   Naturally i got into the darkroom as soon as i could and that is when misfortune struck.  I decided to do some lith and try out some of these new papers.  I have used Fotospeed Lith and Art Document before but i tried some again (after all, everyone loves 9.5x12, right), and i also tried some of the seagull as i believe it is great for lith.  Unfortunately none of the prints turned out particularly well.  I think i chose the wrong negatives and they came out looking dull.  But, on the bright side at least i learned how the papers act in lith so i can know what results to expect next time.


   The Nab shot is from my recent trip to the east coat, and the one of the boulder is from an old negative i dug out - i am thinking both of these probably deserve a bit of time trying to get a good fine print out of.  I have struggled with the nab shot in the past but i put that down to being in a 'funny mood'.  Perhaps another session in the darkroom will reveal if i can make anything of it.  The boulder shot has great detail in the sky so i may try and make a moody print out of it with lots of lovely cloud contrast.  As for the castle shot, i found that on a recent walk with the dog and it would make a great print except for the face that the development messed up.  I'm not sure if you can make it out but there are loads of white dots all over the print.  For some reason i rated Ilford Pan F+ at 25iso and in Rodinal that doesn't work out too well.  Looks like i will have to return there with some FP4+ and re-shoot.

  I haven't really done much else lately.  I have been toying with doing some zone system testing to determine the best ISO and development times for my setup.  It is something i should have done ages ago but, as you should know by now, i am somewhat lazy and it feels like i'm wasting film (even though i know i'm not).  No doubt i will write a tutorial all about it (if it is successful).  I really do need to get better at getting work done and getting this blog updated more regularly.

Monday, 14 July 2014

The Power of Selenium

  I've spoken many times on this blog of how much i enjoy working a negative until i get the final print that i want.  I love working out the dodging and burning for different areas of the print and thinking about the toning i want to do to complete it.  That being said, this print was an absolute killer.  Once again it is from my recent holiday away to the eats cast of England to enjoy the pleasant life of a fishing village for a week.  I have been here many times before and fancied some new spots to shoot so i had a quick look around online before i headed out.  A little bit of research revealed a somewhat hidden bay on the coast complete with rock shelves and nabs (a nab is an outcrop of rock which the sea has not eroded - think stack).  Perfect!  We ended up going there for a day midweek and had a fantastic time walking the dog and relaxing on he sand and rocks.  Of course, i had my Bronica kit with me and was going a bit trigger happy.  I took this shot low to the ground with a nice shapely rock in the foreground and a distant nab and cliff in the background.  The sky seemed good so marvelous, i could burn that in as much as need be upon my return to the darkroom.

  After i developed etc i setup a flat print (after determining the best overall exposure using split grade test strips) i got a flat print exposure.  And it looked rubbish.  So, off i went exploring my dodging and burning options - sheet after sheet after sheet after sheet of paper was used (i was using Slavich Unibrom for it's cold tone and nice heavy weight).  I got a print i was semi happy with and decided to tone (after a wash of course).  I copper toned for a short period then put it into selenium - after a few minutes large white spots started to appear (this is where we learn to selenium tone before copper) so i scrapped it, deciding it didn't look right anyway.


  No amount of dodging and burning that i did made the print look right.  I wanted something dark and i just wasn't getting it.  Perhaps i'm just not at the skill level to do that kind of print yet - hopefully one day i will be.  It's prints like these that really test me!

This is the best i got alas.
   After hours of trying and eventually running out of Unibrom i knew it wasn't happening - i just couldn't get any "pop" out of the print.  I decided to clear my mind and approach it from a lith point of view.  Sometimes, if i'm honest, lith feels like a bit of a cop-out.  I suppose that's because i'm not spending hours configuring dodging and burning charts, i'm just picking an exposure and slapping some paper in a tray.  There is more skill to it than that, and there's nothing wrong with dodging and burning for lith - a fact i had to reassuring myself with.

  Now one of mankind's oldest questions - which paper to use.  After much deliberation i decided to go for Fotospeed Lith paper as i knew it would give me a dark feel and suitable colouring.  So, i picked my exposure and developed until the sky had good detail.  After snatching, fixing and washing i was left with this:

  Good, i thought, but not quite there.  The shadows are a bit...green..!  As is usual with my lith prints i like to see how they react to selenium toner.  In this instance i chose a dilution of 1:5 as i knew it would give more of a colour change than a weaker ratio.  I popped the print into the tray and it went nuclear!  The shadows got absolutely obliterated, the sky darkened dramatically and almost all detail was lost in the foreground rock.  I felt crushed - all that hard work wasted.  I decided to let it dry and think about my next step.

  After a few days of moping about and being busy with work i went back to look through my prints and you know what - i decided i liked the final print i got.  I was suitably dark and it was moody.  It probably isn't going to go down in history as one of my greatest prints but i like it so i decided to leave it there and move on to another negative.  But then again - looking at the above photo of my pre-toned print, i'm liking that as well...


  One thing we learn - never underestimate the power of selenium!


Saturday, 22 March 2014

Finishing in the Mountains & Digging into the past

  My previous post was regarding the prints i made from a roll of film i shot whilst away on holiday in Glencoe, Scotland... and so is this post!  This week has been one of those wonderful weeks where Jess has had a lot on in the evenings, so i've been pretty much left to my own devices.  An we all know what that means don't we - key out, gate open, electric cable in, red light on!

  On the roll i shot there were two more prints i wanted to make.  I may end up printing some of the other frames at some point in the future but at the moment i don't find the "subjects" particularly interesting on one of them and the other one is ever so slightly out of focus (dammit)! 

  I started off in my usual manner on my first print - test strips, proof prints etc but after an hour or so i couldn't seem to get a decent looking print.  I knew i wanted to lith print the other two so i decided to try and lith this first one as well.  I mixed up some LD20 (15A, 15B, 10 old brown and make it up to an 800ml solution).  For the first print i decided to dig into my mini-stash of Orwo BN118 which is a paper i know nthing about except i have used it on a few prints previously and it tends to give a nice brown colour overall with not very much infectious development (much like Agfa Brovira which i'm a huge huge huge fan of).  Previous prints i have made on this paper didn't really have many highlight tones so i was interesting to see how it would handle the sky in this shot.  I did a test strip, determined the correct exposure, added 3 stops, exposed and started developing.  Eventually i pulled the print, stoppped, fixed and rinsed as usual, gave it a little dunk in selenium toner (1:9) and this is what i got:

  Not the greatest print i've ever done i reckon but a good start.  The paper has handled the highlights well (not that there are tonnes) and the shadows are nice and gritty.  To be honest the composition and light on this shot isn't the best but not much i can do about that now is there?!

  My next print was one i took on the road to Glencoe.  There's a huge layby on a sweeping bend of the road which was practically made for tourists.  I was there for about 45 minutes and i think at least 5 coach loads of people came and went in that time, compact cameras a-flashing.  I found myself chuckling when i pondered how their images would turn out.  For some reason people's holiday photos just amuse me - "here's a lovely landscape with my wife stood in front; here's an interesting statue with my daughter in front, here's a hedge with my brother in front".  Bizarre how most people seem to think shots are improved by having family members stood in front of them.  I think it may stem from my parents who overload on holiday photos, every single one having my mum or dad stuck right bang in the middle of the scene!  Anyway - back on track!  I did two exposures at this scene, one standard and one using a cheapo 10 stop filter i got off ebay/amazon (i can't quite remember).  After inspecting the contact sheet i decided to print the long exposure one (seriously, the exposure was like 8 minutes or something - i'd give you an exact figure but my notebook is buried in the under-stairs cupboard and going in there is an undertaking that requires at least half a day and a hearty breakfast, neither of which i have), predominantly because the sky had a better looking shape and also because there was a huge drying mark on the standard one.  I decided to use my precious precious supply of Fotospeed Lith paper for this print.  This paper is long gone but i got 20 sheets on ebay months ago and i'm saving it for very special prints and this felt like one of those.  In my mind i pictured something dark with emphasis put on the lake and sky.  I chose an exposure accordingly and started to develop.  When the time seemed right i pulled the print, processed and selenium toned in 1:9 again.  This caused a boost in the blacks as usual which resulted in some slight loss of detail in the foreground landscape - i expected this though and it was what i wanted.  I wanted the foreground to look almost blocked up so as to add further emphasis to the lake (which took on a lovely pale lilac type colour).  Here's the final result:

  I think it works well and i like the pale pastel tones taken on by the highlights.  Now if only Fotospeed would bring the lith paper back out (only 16 sheets left)!  On your screen you may be seeing some brownish areas in the dark foreground, that's just come from scanning - the print wasn't entirely flat and so some light got in, a bit of a pain but i'm not going to rescan and edit it all over again - just imagine everything in the balck areas is entirely black!

  For regular readers of this blog (if indeed there are any) you may pick up on the vibe that i begrudge wasting chemicals - they're expensive and i want to squeeze everything out of them that i can.  Some would coll that anal, i call it thrifty!  I knew that would be power for at least one more print in the lith developer so i hit the negative folder hard in search of something to print from my past.  I eventually stumbled upon  roll of film i shot at Whitby Abbey a few years ago on my honeymoon (7th May 2011 - a real man remembers when he got married) and realised i had never really printed from it (at that time i was still scanning all my negatives - terrible)!  The whole roll was pretty much a write-off mostly due to lack of ability to not chop the tops of images off when using a Diana camera.  One shot looked great though (even if it is from the exact same angle that everyone seems to take pictures of Whitby abbey from) so i decided to lith it and see what we got.  I spent a few minutes pondering what paper to use (because as you should all know by now paper choice has a massive effect on final print in lith).  As i was feeling somewhat devil-may-care a decided to use a sheet of my even-rarer-than-fotospeed-lith tapestry paper.  This is a textured "art" paper that liths incredibly well and when put into selenium toner will give at least 3 colour splits.  I have used one sheet before to create a watercolour style effect - see here for details.  I decided to give it a go with this print as it was somewhat heavier on the shadows and lower midtones than i have previously lithed on this paper, i was interested to see what i would end up with.  I determined exposure, processed and dipped into the selenium toner (1:9 again) and as expected colours kept changing from the shadows up through to the highlights.  I kept the print in the selenium until i got a nice cool grey in the lower mids and lovely pale pastel yellows and lilacs in the tones of the sky.  When using this paper previously i would paint the toner onto areas i want to alter the colours of but i thought this print looked fine as it was so i left it to dry (keeping in mind that when wet it is a yellowy colour but would dry-down to a salmon pink tone).  Once dry i was pleased with how it looked:

  Again - scanning problems!  Because this paper is heavily textured it wouldn't render the blacks actually black so they have the kind of look you get when you're trying to scan through dense colour film.  Again, just imagine that the shadow areas are solid black! 

  So, a successful darkroom session from which i learnt the following things:
  • I hate scanning
  • Lith printing continues to rule
  All i need to do now is actually go out and shoot some more film (it's been 2 months since i've even touched my camera - naughty me) so i can crack on printing.  Perhaps in the meantime i should go back through my old negatives and see if there's anything i've missed.  until next time - happy printing!

Friday, 31 January 2014

Thankyou Eddie!


  Have you ever had a moment of pure coincidence, where you were in the right place at the right time for something great to happen?  I had one a few months ago – it was early May and Jess and I were out celebrating our 2nd wedding anniversary (how time has flown).  We had had an expensive month what with moving house and Jess changing jobs so we didn’t really want to go away for a break.  We decided to just have some nice time off to relax and enjoy each others company.  We had a few outings, one of which included a shopping trip to Manchester.

  Even though i’m a manly man with a manly mans beard, i do enjoy a shopping trip.  And when you get to spend it with your beloved even better (see how i am laying on the affection – although soppy this will earn me darkroom time at a later date).  We wandered round for hours, pottering around the usual shops, enjoying our time together.  When you live in Preston, Manchester is like shopping heaven – which brings me to the focal point of this tale.  Manchester houses the closest analogue camera/darkroom store to where i live, namely the Real Camera Co (yes i am aware Calumet have a store in Manchester also, but it isn’t in the city centre is it).  Whenever i am in the area i make a point to pop in, even if i don’t need anything.  The chance for me to go into such a store is a such a rarity that to pass it up seems foolish.  No amount of googling or apugging can ever make up for seeing cameras in the flesh.  Hasselbalds, Mamiyas, Bronicas, leicas, Graflexes etc  are all lined up ready to be drooled over.  

  They also have a nice little book section to peruse through.  I decided to have a pick through as darkroom books are always a treat to have and you never know, there may be a few hidden gems.  Eventually i stumbled upon a book called Creative Elements by Eddie Ephraums.  I wasn’t familiar with his work but i bought the book anyway as it was on a couple of pounds and it seemed interesting.  Only when i got home and started reading did i realise the magnificence of what i held in my hands!  If you are unfamiliar with this book i recommend you go onto amazon immediately and fork out the paltry sum of £2.04 so that you too can own it.  Unlike other darkroom books Ephraums takes a number of his own images and talks you through what he did from setting up the camera, developing the film and creating the final print.  He includes his dodging and burning charts, and most importantly he reveals his mistakes throughout the process.  

  The best part of this book, however, lies in what Eddie shows us can be done with a "mediocre" negative.  Almost every developed film has at least one frame (be it landscape, portrait or whatever) that is dull, flat and lifeless.  Whilst we usually pass these by in favour of “superior” negatives, Ephraums shows us that these frames should not be so forgotten.  

  Take, for example, the following three frames (sorry about the quality, they are just mobile phone pictures taken straight from the book):


   If i had these shots on a negative, i'd probably play around with them for a while but then end up moving on to something else.  Now look at what Ephraums did with these shots (again, sorry about the quality):


  A complete transformation!  By effective use of dodging & burning, creative choice of paper grade and use of toning & bleaching, Ephraums is able to completely change the look and feel of the image.

  And that is something i hadn't really come across before.  Naturally i had read and seen may examples of dodging and burning etc at work, but i had never considered how they could be used so  extensively in completely changing an image.  Which i guess is where 'art' and 'expression' come into photography.  This revelation led me to look back over my old negatives.  Unfortunately the reason most frames on my old negatives didn't get printed was because of scratches, fingerprints and blemishes on the emulsion.  However, i remembered the roll of film i had recenty shot on a day out with a friend.

  We had gone up to Ribblehead so that i could take some photos and he could paint the majestic viaduct.  The weather was grey and overcast with sunny spells so i didn't hold out much hope for getting any great photos.  But still, it was nice to be out for a day with a close friend.  We took an appropriately oversized picnic, set up our chairs and took in the beautiful scenery.  The moors of the Forest of Bowland and Yorkshire, although quite bleak, are beautiful places which are often overlooked by many in favour of the Lake District.

  Unfortunately the viaduct was very popular with walkers that day so i couldn't get a clear shot.  Also some moron thought it was fine to drive his van down the footpath and park right in front of the viaduct, thus saving himself 5 minutes of walking time.  I didn't really visualise having a bright white van in the foreground of my final print!  On another note, why oh why do people use trekking poles when walking along the flattest and widest footpaths in the world?  The only time you need to use trekking poles are if your walking up a mountain.  And i mean a mountain, not some little hump in the Lake District!  Anyway, i decided to leave Daniel painting and go for an explore of the local area.  I found a few small caverns and limestone pavements, but nothing that i fancied shooting.  I looked to the horizon and saw a distant hill, small and long, with fields in the foreground and some nice clouds in the sky above it.  I thought "what the heck", setup my tripod, composed and exposed.  I only shot two frames that day which felt wrong, but at least i had a good time doing it.

  Fast-forward a week or so and my film is developed and dry (i used up the rest of the roll a few days later on a day out with Jess).  By the way i promise i don't just go out all the time - i do some work too!  Anyway, the film was dry and i did a quick contact sheet.  A few frames looked promising so i stored that information in my head for when i got a chance to print.

  Friday.  Jess is out at a wedding all day and it looks like she's not getting home until late.  That means i've got at least 2 hours after work for some quality me time.  Into the darkroom i go.  I didn't really fancy doing any lith printing and i was in a landscape mood so i reached for the Ribblehead and Bowland negatives.  I decided to give the hill shot a try, even though it looked a bit dull and uninteresting.  Everything was a flat grey and seemed a bit "meh".  I decided to have a quick thumb through Ephraums book to get some inspiration before i cracked on.  A few test strips and proofs and i was in the area with my base exposure.  I did a few more strips for dodging and burning and then tied it all together onto one print. A bit more work required.  A little more dodge, a little more burn and then suddenly a decent-looking print started to appear.  A few sheets later and i had a print i was very happy with indeed.

  I decided to switch from RC to FB paper as i wanted the look FB gets with the sepia-selenium toning i had in mind.  I adjusted my exposure accordingly and compensated for drydown.  A few minutes later i had the print in my hand and it looked good.

  I ran into the kitchen and set the tap running whilst i set up my toning gear.  I previsualised sepia and selenium for the final print so i laid out my trays.  After the wash i slid the print into the bleach for around 8 minutes, pulling it just as the shadows were starting to lose density.  I didn't want to bleach back the whole way because then the selenium would have nothing to work with.  A quick rinse and then into the sepia for a few minutes.  The print turned a lovely sepia tone, better on the FB paper than it would have been on RC.  Once toning was complete i did another wash and then put the print in the selenium.  I used a mix of 1:9 as i only wanted a slight colour shift.  The shadows went a deep brown and the sepia highlights and midtones turned from a yellow to a deeper, richer brown which was exactly what i wanted.

  After leaving the print to dry i was left with exactly what i wanted;

  Compared to the original flat print the final print is so different and i'm really happy with it.

  So what do we learn from this long and winding tale?  Never ignore a seemingly dull or uninteresting negative.  With a little work and dedication you can breathe new life and energy into an image.  Plus, everyone loves seeing a complicated set of dodging and burning plans written down don't they?!  And it feels good to really work at a print and shape it.

  All that is left for me to say is "thankyou Eddie", without your book i may never have unlocked the potential of many of my negatives.

Monday, 6 January 2014

Surprisingly Pleasing Surprises


  Most of the time when I go into the darkroom I have a pretty good idea of what I want to achieve.  This isn’t really due to any forward planning or meditation, I just can’t get in there as much as I would like and so I tend to have a few days between sessions where I can be thinking about what I want to do with certain negatives.  So when I went into the darkroom last week I knew what I wanted to do with my latest negative.

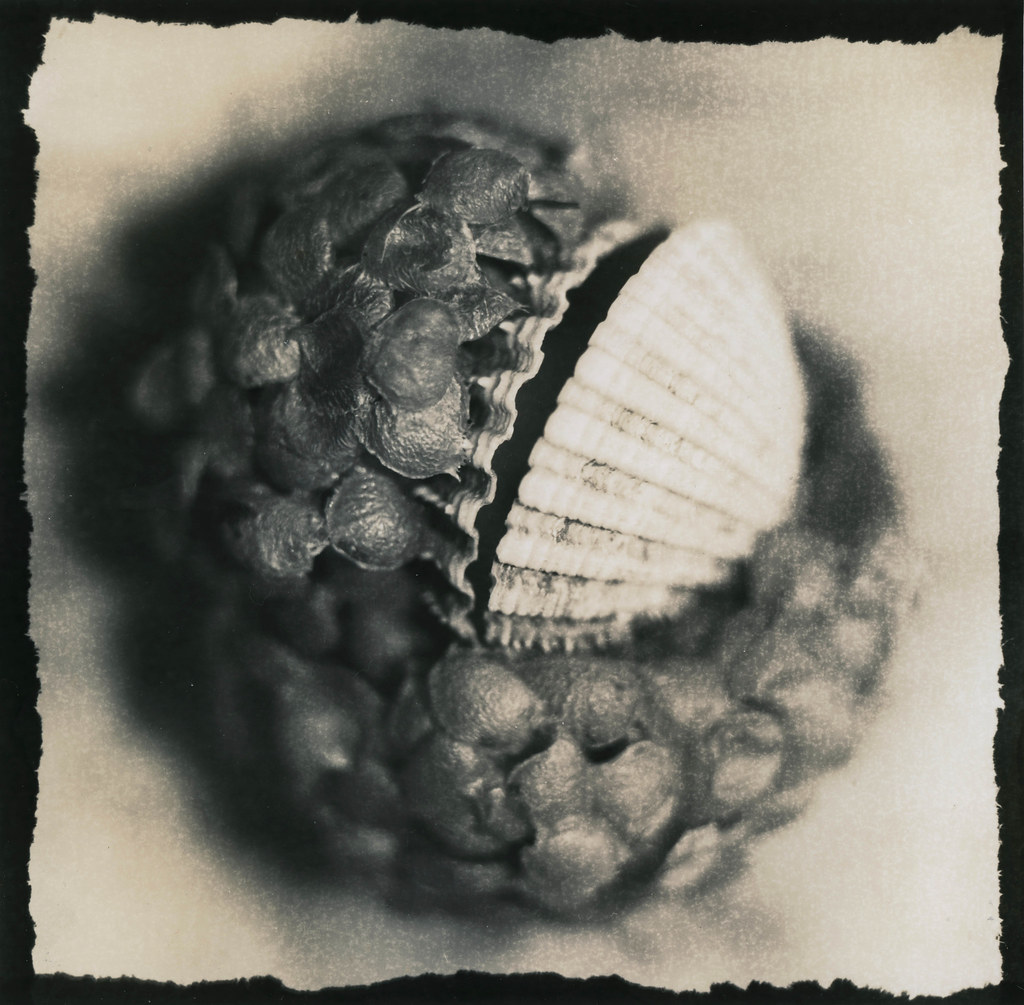
  I had taken Ellie (our dog) for a walk on the beach with Jess earlier in the week.  The tide was out so there were small pools everywhere filled with starfish, crabs, shells and seaweed.  As I had a few doggy poo bags in my pocket I decided to fill one with various shells and things from the beach so I could shoot some still life (I hadn’t shot any film in ages and I was starting to get twitchy)!  So I filled my bag, tired out the dog and headed home.

  The next day I setup my new Bronica body (yes, I replaced the broken one at last) on my new tripod, setup some lights and got shooting.  I used the S-36 extension tube to get up nice and close, then added close up filters where necessary.  Side lighting came from a table lamp shining from above and slightly to the right of “the subject”.  I used the auto prism I had received with my new body for exposure as I (shamefully) couldn’t be bothered spot metering it.

  Once done I loaded the film into the tank and mixed up my chemistry.  I developed the Pan F+ for 15 minutes in ID11 1:3, stopped, fixed and washed as usual.  Unfortunately the negative came out very thin indeed.  I’m assuming the developer stock solution had expired as I mixed it up about a month and a half ago, but maybe the auto metering wasn’t up to scratch; I don’t see why though as it was a very low contrast scene.  I don’t really use ID11 so that’s my excuse, I should have just stuck to Rodinal but I didn’t want to waste chemistry.  That’ll teach me!

  So, with dry negative in hand I entered the darkroom.  I started, as usual, by making a contact sheet; I’ve been doing that a lot more lately as it’s a good practice to get into.  I could see from that that there were only two or three frames I liked enough to print so I loaded the first and made a test strip.  After fiddling with contrast filters and exposure times I settled on Grade 4 at 4.00 seconds on Kentmere VC Select.  That’s a tiny amount of exposure.  Normally my base exposures are in the 18 seconds mark at grade 3, so you can see just how thin the negative was!  Fortunately, for this frame, all the detail I wanted was recorded on the negative.

  What I had planned for this negative was some second pass lith. If you’re not familiar with it please see here.  Basically you overexpose a print, bleach it back as far as you like then put it into lith developer.  So, I made my overexposed base print as described above:

 Then I bleached it back until the border shadows were just starting to be affected:

   Then I redeveloped in lith, stopped and fixed as normal.  What I found interesting is that the print did not redevelop as much as I thought it would.  Theoretically the print should just keep developing until it is all black, but this print didn’t and I’m not too sure why.  I haven’t really done much experimentation with second pass lith, I really should devote more time to it. 

  So here is the final print.  Note I didn’t get the usual greys and pinks with this paper, but a paler grey and some yellowy highlights which, although unexpected, are still pleasing to the eye:


  So what do we learn?  Sometimes what you plan isn’t what you get.  Often something surprising can happen, and often that surprise is something good.

Monday, 16 September 2013

No, No, No, No, NO, NO, NOOOO!!!


  I went out shooting at the weekend.  Which turned out to be a very bad idea.  A very very bad idea.  I discovered last week that a section of coastline not far from me had lots of wooden coastal protection.  Coastal protection = photographers delight so I decided to head out there on Saturday (along with Jess who, as it was sunny, decided to leave the house).  We had a lovely walk but alas it was too sunny and I only shot two frames.  The tide was a little too far out as well so there wasn’t really much to photograph as I was in a long exposure mood.

  I decided to head back at sunrise the next morning when the light would be a bit flatter and the tide would be all the way in.  I woke up Sunday morning wide awake, grabbed my gear and shot out of the house.  Half an hour later I was parked up and walking through the dunes, it was drizzling a little but I thought I’d endure, I could always run back to the car if conditions got worse.  I setup and shot 5 or so frames, keeping my eye on the tide as it turned out I had arrived just before high tide so the water was coming in fast.

  On the 8th or so frame as I was setting up the water came shooting in up the side of one of the coastal protection barriers and headed straight for my bag.  I ran back and snatched up my bag only to turn and see my camera ditch sideways into the sand. ARGH!  I ran back and up-righted the tripod to find my camera encased in grit.  I dusted it off and re-seated the tripod just as the tide came sweeping in again and half inundated my camera bag. ARGH AGAIN!  I ran back, rescued the bag and moved it further inland just as my tripod decided to blow over again and ditch my camera into the sea. 
AAARRGGHHHH!!  I ran back, rescued the camera and ran inland.  Well, the water had washed off the sand which was nice but water and cameras are never a good mix.  Fortunately there are very few electronics in my Bronica.  I grabbed my gear and decided to head home.  I split my SLR kit up and put it on the passenger seat of the car with the air blowers on full.

  When I got home I used a brush to dust off as much sand as I could and left the gear to dry.  It’s still drying now and every few hours I dust off any loose sand.  Handily the squeak on my 80mm lens has disappeared but alas my 50mm makes a horrible grinding noise when focusing.  It looks like no water got into the camera body or the film back which is a bonus; it’s just the 50mm lens that seems to have taken most of the damage.  Ill dry it and clean it as best I can but time will tell if any salt remains inside to cause any damage. 

  I decided to develop my film using PMK Pyro, praying that it would have some good shots on.  Alas, on removing the film from the tank it was almost transparent.  I’m not sure what happened, it looks like it didn’t develop fully.  My guess is the Pyro was dead as it was a very old stock solution, but I can’t be sure.  So now I am left with a potentially knackered camera and no pictures to show for it.  Damn.

But here’s what I learnt from my day of tragedy:


  1. heavy tripods are a wise investment
  2. sand and seawater do not compliment camera gear
  3. PMK Pyro solutions need to be used up quickly
  4. incoming tides move in rapidly
  5. cameras take a long time to dry out
  6. hats are useful for covering lenses
  7. it is hard to keep filters sand and water free when it is raining and you're on a beach


Hopefully you will learn a lesson from this tale of woe.  Keep your gear dry and avoid wet and windy beaches.  Right, message sent - i'm off tripod shopping...