Showing posts with label rodinal. Show all posts

Monday, 24 February 2014

Starting My Glencoe Prints

  As mentioned at the end of the previous post i have been working on some prints from my recent trip away to Scotland.  What with Blogger being such a temperamental website i haven't been able to upload any images for ages, but now, finally, i can!  I have made two prints of the roll i shot so far and i really feel like they have been a huge step forward for me in my printing.  I put a lot of time and effort into realising in print form what i saw in my mind at the time of exposure.  In this post i will show you how i created each print and hopefully this may give you some ideas or maybe even some inspiration.

  Making these prints i really got to grips with my new(ish) f-stop timer.  I'm pretty sure i used every function on there - dry down compensation, split grade mode, dodging and burning programming

So, to the first print...
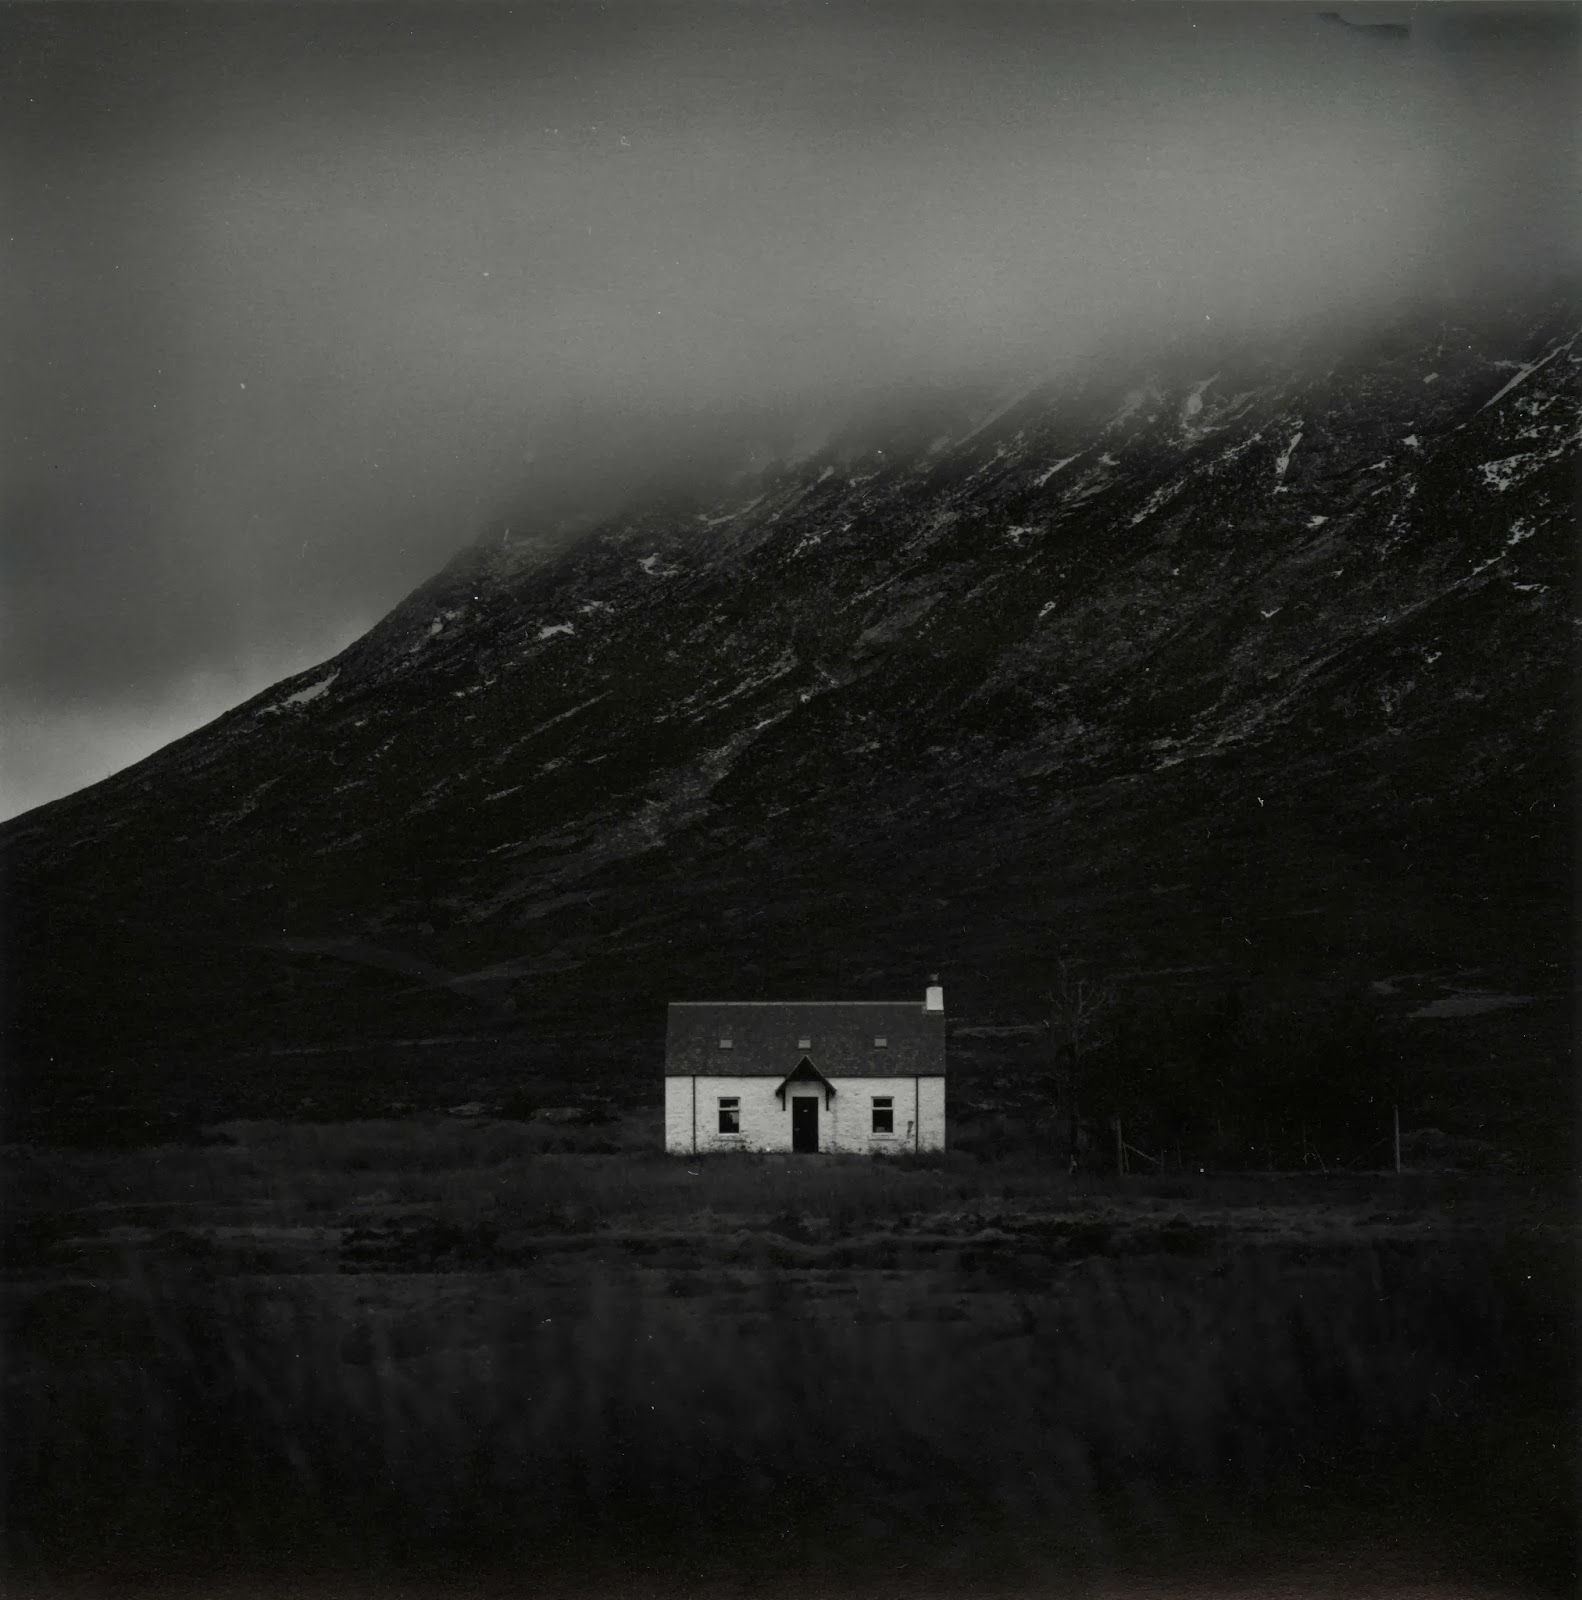
Cottage in Glencoe
  Over the week i was away it transpired that i only had one day midweek in which to get over to Glencoe and take some pictures.  I could spend a year up there and never run out of things to shoot, it's a truly remarkable place!  Unfortunately when i woke up the weather was terrible.  The cloud layer was super-low and didn't really have any form, it was just a grey mush.  I decided to head out anyway, sod it, it might clear up later.  As i got up to Rannoch Moor i hopped in and out of the car a few times to grab a few shots and move further up the road.  Jess had lovingly decided to come with me and we brought Ellie (our puppy) along too, and she loved it.  I've never seen a dog run so fast and be so excited to be outside!

  As we made our way down the Glen we went around a sweeping left hand bend and i saw a large smooth valley which was catching the sun nicely.  I parked up in a convenient layby, grabbed my gear and started walking, waving bye to Jess as she had decided she was tired and didn't want to step foot out of the car again!  It turned out i was walking through a bit of a bog but i didn't mind as clever me had remembered to wear my waterproof sock liners (get some, thank me later).  I took some time setting up the shot and finally exposed the frame (which i haven't yet printed).  Then just off to the left a white cottage caught my eye, it was really standing out from the murky grey of the clouds so i decided to head closer and see if it was a workable shot.  I found a nice vantage point, focused, metered and then exposed.

  Upon my return home i developed the film (in Rodinal of course) and left it to dry.  A few days later i freed up some time and made a contact sheet.  I spotted quite a few frames which i liked the look of but this one seemed to be the best on the roll so i decided to have a go at it first.

  I couldn't get into the darkroom to print for a while but Jess decided to  go visit a friend for the day and so i took that as a sign to go print!  I haven't really had a decent chance to fully get to grips with all the functions of my recently acquired RH Designs Stopclock Pro f-stop timer.  i decided to put it through it's paces today and do some split grade printing.  I setup the negative in the enlarger, focused, set the contrast grade to 00 and did my soft test sheet.  I used to just use offcuts of paper for making test strips but i have found that because i am doing lots of dodging and burning to my prints these days a whole sheet makes it easier to deduce times for all parts of the image.  My test sheets tend to go from around 5 seconds up in 1/6 of a stop intervals, if i need anymore i will just do a new one.

  I chose the strip with a base exposure of 8.98 seconds because it gave tone to the snows on the mountain top.  I knew i would want the cottage walls to be lighter but more on that later.

  Next i did my grade 4 1/2 test sheet (i can't do grade 5 with the colour filters on my enlarger).

  Again i chose the 8.98 second exposure time as it gave me good, deep blacks.  I was happy with the contrast overall so i turned my attention to dodging and burning.  I knew i wanted to lighten the cloud somewhat and darken the foreground to really made the cottage stand out.  This is where offcuts of paper come in really handy - any dodging and burning times i cannot figure out from the test sheets i made earlier i can deduce using small strips of paper placed in the relevant parts of the image. 

  After much trial and error i got the dodging and burning times i wanted.  During the soft exposure i dodged the sky for 3/4 of a stop and the trees to the right of the cottage received a 1/3 of a stop burn.  Then the right, left and bottom edges of the print received an extra 1/4 of a stop each.  Then i switched to the grade 4 1/2 filter and dodged the sky 1/3 of a stop.  The trees received another 1/3 of a stop burn (if you don't do the same dodging/burning on the same part of the print with both filters then you change the contrast) and the bottom edge of the print received an extra 1/3 of a stop.  The right edge then received 1/6 of a stop to balance it out whilst the cloud received 1/6 of a stop burn in a series of small up and down gradations of a rectangular piece of card.  This added a slight gradational effect to the sky.  Finally each corner got an extra 1/6 of a stop just to add a slight vignette.  This left me with this:

  I was close but the cottage wasn't quite popping enough.  I brushed some dilute potassium ferricyanide/potassium bromide bleach over the cottage which lightened the highlights slightly and added extra pop.  I re-fixed and then toned in selenium1:5 for 2 minutes.  This gave me this print:

  The selenium has added extra pop (I love selenium) but i wasn't quite happy with the print.  I decided to go crazy and dig out the few sheets of warmtone paper i have, I felt that this print was worthy on going onto this expensive paper!  I made an identical print and set the drydown compensation to 5% (drydown is the effect of fibre prints going darker when dry - a pain)!  This time i fully toned in selenium (4:30).  I did try pulling the print from the toner around at 2 minutes but it looked strange being a warm reddish colour all over with a grey sky on top.  After all this work i was left with my final print which i think is my best print yet:


Kinlochleven Island

  I decided to keep going and work on another print i thought could be good.  This was taken whilst exploring around Glencoe.  I went up a random road and ended up at the village of Kinlochleven.  A lovely place that i'm pretty sure i could live in happily!  It was raining pretty heavily when i was taking this but it was worth it as you'll see.

  As before i decided to split grade print.  I setup and made my soft test sheet:

   I chose a base exposure time of 4 seconds and proceeded to make my hard exposure:


  For the hard exposure i chose a base exposure of 16 seconds.  I made a flat sheet of the two exposures together and came up with this:


Good but it needs some work.  The top left corner is a bit dark and i want the final print to be darker and more ominous.  I got to work figuring out what dodging and burning was required.  During the soft exposure I added and extra 1 1/2 stops to the foreground and and extra 3/4 of a stop to the right, bottom and left edges of the print.  I then switched to the hard exposure and dodged the top left corner for 1/3 of a stop and dodged the mountains in the distance on the right for 1 1/6 stop to balance them with the mountains on the right.  I then added 1 5/6 to the sky and 1/2 a stop to the foreground.  The top half of the sky then received and extra 1 1/2, the right corner got +1 stop and the bottom left and bottom right corners received an extra 1/3 of a stop.  I then locally bleached the sky directly above the island with potassium ferricyanide/potassium bromide to emphasize the light coming from there.

  After a dip in selenium i got this print which is much moodier and ominous:

  I then switched to warmtone paper and made an identical print which is my final print (unfortunately when scanning i somehow cropped the very top of the print off - error):

  I learnt a lot making these two prints.  Firstly, it really pays to imagine what you want your final print to look like when you are exposing in camera.  Secondly, it's good to make your test strips and rough prints then rest and come back to the final print at a later date, otherwise you rush to get it all done in one session and you don't get the best print you could have done.  Thirdly, never underestimate the power of bleaching. Fourthly, warmtone paper is worth every penny.  Fifthly, selenium toner remains the greatest thing in the world.  Sixthly, Scotland is one heck of a place!  Seventhly, and perhaps most importantly - never be afraid to get your camera out when it's mirky, grey, grim and wet.

  Well i hope that's been interesting for some of you who read this blog (if indeed anyone does read this blog).  I hope that my experiences will help you in some way.  As always if you have any questions or comments then please feel free to get in touch - i love hearing from you all about your own printing and photography and i love learning new things from you all.  Happy printing!

Friday, 31 January 2014

Thankyou Eddie!


  Have you ever had a moment of pure coincidence, where you were in the right place at the right time for something great to happen?  I had one a few months ago – it was early May and Jess and I were out celebrating our 2nd wedding anniversary (how time has flown).  We had had an expensive month what with moving house and Jess changing jobs so we didn’t really want to go away for a break.  We decided to just have some nice time off to relax and enjoy each others company.  We had a few outings, one of which included a shopping trip to Manchester.

  Even though i’m a manly man with a manly mans beard, i do enjoy a shopping trip.  And when you get to spend it with your beloved even better (see how i am laying on the affection – although soppy this will earn me darkroom time at a later date).  We wandered round for hours, pottering around the usual shops, enjoying our time together.  When you live in Preston, Manchester is like shopping heaven – which brings me to the focal point of this tale.  Manchester houses the closest analogue camera/darkroom store to where i live, namely the Real Camera Co (yes i am aware Calumet have a store in Manchester also, but it isn’t in the city centre is it).  Whenever i am in the area i make a point to pop in, even if i don’t need anything.  The chance for me to go into such a store is a such a rarity that to pass it up seems foolish.  No amount of googling or apugging can ever make up for seeing cameras in the flesh.  Hasselbalds, Mamiyas, Bronicas, leicas, Graflexes etc  are all lined up ready to be drooled over.  

  They also have a nice little book section to peruse through.  I decided to have a pick through as darkroom books are always a treat to have and you never know, there may be a few hidden gems.  Eventually i stumbled upon a book called Creative Elements by Eddie Ephraums.  I wasn’t familiar with his work but i bought the book anyway as it was on a couple of pounds and it seemed interesting.  Only when i got home and started reading did i realise the magnificence of what i held in my hands!  If you are unfamiliar with this book i recommend you go onto amazon immediately and fork out the paltry sum of £2.04 so that you too can own it.  Unlike other darkroom books Ephraums takes a number of his own images and talks you through what he did from setting up the camera, developing the film and creating the final print.  He includes his dodging and burning charts, and most importantly he reveals his mistakes throughout the process.  

  The best part of this book, however, lies in what Eddie shows us can be done with a "mediocre" negative.  Almost every developed film has at least one frame (be it landscape, portrait or whatever) that is dull, flat and lifeless.  Whilst we usually pass these by in favour of “superior” negatives, Ephraums shows us that these frames should not be so forgotten.  

  Take, for example, the following three frames (sorry about the quality, they are just mobile phone pictures taken straight from the book):


   If i had these shots on a negative, i'd probably play around with them for a while but then end up moving on to something else.  Now look at what Ephraums did with these shots (again, sorry about the quality):


  A complete transformation!  By effective use of dodging & burning, creative choice of paper grade and use of toning & bleaching, Ephraums is able to completely change the look and feel of the image.

  And that is something i hadn't really come across before.  Naturally i had read and seen may examples of dodging and burning etc at work, but i had never considered how they could be used so  extensively in completely changing an image.  Which i guess is where 'art' and 'expression' come into photography.  This revelation led me to look back over my old negatives.  Unfortunately the reason most frames on my old negatives didn't get printed was because of scratches, fingerprints and blemishes on the emulsion.  However, i remembered the roll of film i had recenty shot on a day out with a friend.

  We had gone up to Ribblehead so that i could take some photos and he could paint the majestic viaduct.  The weather was grey and overcast with sunny spells so i didn't hold out much hope for getting any great photos.  But still, it was nice to be out for a day with a close friend.  We took an appropriately oversized picnic, set up our chairs and took in the beautiful scenery.  The moors of the Forest of Bowland and Yorkshire, although quite bleak, are beautiful places which are often overlooked by many in favour of the Lake District.

  Unfortunately the viaduct was very popular with walkers that day so i couldn't get a clear shot.  Also some moron thought it was fine to drive his van down the footpath and park right in front of the viaduct, thus saving himself 5 minutes of walking time.  I didn't really visualise having a bright white van in the foreground of my final print!  On another note, why oh why do people use trekking poles when walking along the flattest and widest footpaths in the world?  The only time you need to use trekking poles are if your walking up a mountain.  And i mean a mountain, not some little hump in the Lake District!  Anyway, i decided to leave Daniel painting and go for an explore of the local area.  I found a few small caverns and limestone pavements, but nothing that i fancied shooting.  I looked to the horizon and saw a distant hill, small and long, with fields in the foreground and some nice clouds in the sky above it.  I thought "what the heck", setup my tripod, composed and exposed.  I only shot two frames that day which felt wrong, but at least i had a good time doing it.

  Fast-forward a week or so and my film is developed and dry (i used up the rest of the roll a few days later on a day out with Jess).  By the way i promise i don't just go out all the time - i do some work too!  Anyway, the film was dry and i did a quick contact sheet.  A few frames looked promising so i stored that information in my head for when i got a chance to print.

  Friday.  Jess is out at a wedding all day and it looks like she's not getting home until late.  That means i've got at least 2 hours after work for some quality me time.  Into the darkroom i go.  I didn't really fancy doing any lith printing and i was in a landscape mood so i reached for the Ribblehead and Bowland negatives.  I decided to give the hill shot a try, even though it looked a bit dull and uninteresting.  Everything was a flat grey and seemed a bit "meh".  I decided to have a quick thumb through Ephraums book to get some inspiration before i cracked on.  A few test strips and proofs and i was in the area with my base exposure.  I did a few more strips for dodging and burning and then tied it all together onto one print. A bit more work required.  A little more dodge, a little more burn and then suddenly a decent-looking print started to appear.  A few sheets later and i had a print i was very happy with indeed.

  I decided to switch from RC to FB paper as i wanted the look FB gets with the sepia-selenium toning i had in mind.  I adjusted my exposure accordingly and compensated for drydown.  A few minutes later i had the print in my hand and it looked good.

  I ran into the kitchen and set the tap running whilst i set up my toning gear.  I previsualised sepia and selenium for the final print so i laid out my trays.  After the wash i slid the print into the bleach for around 8 minutes, pulling it just as the shadows were starting to lose density.  I didn't want to bleach back the whole way because then the selenium would have nothing to work with.  A quick rinse and then into the sepia for a few minutes.  The print turned a lovely sepia tone, better on the FB paper than it would have been on RC.  Once toning was complete i did another wash and then put the print in the selenium.  I used a mix of 1:9 as i only wanted a slight colour shift.  The shadows went a deep brown and the sepia highlights and midtones turned from a yellow to a deeper, richer brown which was exactly what i wanted.

  After leaving the print to dry i was left with exactly what i wanted;

  Compared to the original flat print the final print is so different and i'm really happy with it.

  So what do we learn from this long and winding tale?  Never ignore a seemingly dull or uninteresting negative.  With a little work and dedication you can breathe new life and energy into an image.  Plus, everyone loves seeing a complicated set of dodging and burning plans written down don't they?!  And it feels good to really work at a print and shape it.

  All that is left for me to say is "thankyou Eddie", without your book i may never have unlocked the potential of many of my negatives.

Sunday, 14 July 2013

Halfway There

   Finally (after many, many, many sheets) I have got a result I am happy with from Slavich Unibrom in lith developer.  I haven't been out shooting much lately so the majority of my darkroom work has been in revisiting old negatives from the time when all I had was my scanner.  I remembered I had shot a few rolls inside an abandoned power station some time ago using my old Lubitel 166b, one of my main cameras before I bought my Bronica SQ-A.  I thought the decay and dereliction inside the station would work well with a cold, stark lith effect so I decided to give it a try.  If I could get the Unibrom to work then I knew it would give me the look I wanted, the problem was that ever since opening the packet I have been plagued with uneven develolment.

  This time, however, I had a plan.  After a hefty amount of googling I had come accross a few people who had soaked their print in warm water for a minute or so prior to developing.  I decided to give it a try, after all - if it messed up I could just add it to the pile of other failures!

  As it so happens the presoak worked a charm! Development started in the darkest areas of the print as opposed to the edges and continued as with any other lith paper.  I let development continue until an appropriate snatch point was reached.  

  The only problem I am still having is in retaining highlight detail, I just cant seem to get that extra bit needed before the blacks get too dense.  Ah well, keep trying I guess!  At least im getting consistently better results now.  Im looking forward to trying out the unibrom again in my next printing session, perhaps with some second pass lith...


Monday, 24 June 2013

Tapestry

  As usual at the weekend i had a bit of time to myself as Jess was working the morning shift (got to love that morning shift)!  What better way to spend this time than by dabbling in the ancient art of printy?!  I was in a very lith mood so i chose a negative from my latest roll of film and picked a paper.  As mentioned previously i recently won a bulk load of paper on EBay, mostly old Agfa Brovira and Portriga, but i also got a small pack of 8 x 10 Fotospeed Tapestry.  Is it lithable?  Internet says yes as does the good old Facebook lith printing group.  A bit of reading in Lord Rudman's lith and toning books revealed this to be a very special paper.  It liths very well and when toned in selenium a wide range of colours are available.  I got set up and gave it a try... and what a paper!  A lovely textured base with a nice matt finish, it liths fantastically and (as we will go on to see) is phenomenal in Selenium.  This is the print i finally got at the end of the process:

  As you can see it has a very different look to my usual lith prints.  It looks (to me at least) like a watercolour painting.  The colours you can get from this paper in selenium are fantastic, but instead of me talking about it - i have pictures!

  The first print i made of this messed up because i ended up putting finger prints all over the paper.  I decided to use this print to see how far the colour change in selenium would go.  What follows is a series of pictures (taken on my camera phone - sorry for the poor quality of some of them) from 0 to 23 minutes taken every 60 seconds to demonstrate the colour changes.

  Firstly here is the original, untoned print:

Untoned, wet print (note the golden yellow colour - when dry this turned a strong pinkish colour)
30s - note the shadows immediately turning a cool purplish colour
1:30 shadows cooling off further and working up to the lower midtones
2:00
3:00 midtones starting to be affected.  Hints of purple can be seen around the boats cabin
4:00 nice separation in the cabin area and increased separation in the sky
5:00
6:00 purple tones taking over the midtones now and moving up towards the highlights.  The sandy foreground taking on a cooler steely grey tone.
7:00
8:00
9:00 cloud separation reducing slightly as the cooler grey moves towards the purple areas
10:00
11:00
12:00
13:00
14:00 the cool grey now slowly turning into a soft creamy buff colour
15:00 as the creamy colour is taking over cloud separation has reduced significantly
16:00
17:00 shadows have a slight olivey brown tone
18:00
19:00
20:00
21:00
22:00
23:00 the cream has settled into a pale creamy grey colour across the print
  As you can see the print goes through many different colour changes before settling down at around 20 minutes or so.  My plan now was to give an overall toning in selenium to get things going then wash the print and, using a paintbrush, place selenium onto the areas i wanted extra toning on.  I started with the sky so as to increase separation between the purple and yellow areas, then i toned the foreground to change it from the cool grey to a sandy yellow colour.  Then i did a little extra on the cabin and prow of the boat to help it stand out from the frame a little more.  I think the final print looks much better with these multiple pastel colours than it would with just one overall tone.  But maybe that's just me.  One thing that i should mention if you should be lucky enough to come into ownership of this paper is that it dries a different colour.  For exmaple - here is my final print when wet:

And here it is dried out prior to toning:

  As you can see we've gone from yellow to pink.  Not quite what i fancied for this print but maybe one to kkero in mind for another subject.

  I'm sure this "toner painting" could be just as easily applied to any other paper.  You probably won't get as much of an extreme colour shifting but you may get something.  It's certainly something i'll be keeping in mind to try out in the future.

Thursday, 6 June 2013

Introducing... Slavich Unibrom!

  During my recent order from my usual photo supply store i got a 25 sheet pack of grade 3 Slavich Unibrom.  This is currently the only true lith paper being made since Foma altered their emulsions some months ago.  Whilst the Foma papers still work in lith they no longer give true infectious development so, alas, do not count anymore... not that i'll stop using them though!

  I had seen from my internet research that Unibrom is a hard paper to tame.  Little did i know!  Normally i can get the print i want first or second try when it comes to lith.  I only just got it on my third try with this paper!  My first print went black very rapidly and my second was way too pale.  The infectious development on this paper is ridiculous!  I am used to developing times of around 20 to 45 minutes when in lith but with Unibrom i was snatching at around 5 minutes!

  The paper itself is lovely.  It has a glossy finish that isn't too in your face but gives a lovely sheen, and with it being double weight it has a nice thickness to it that is a joy to handle.

  Im looking forward to using it some more but ill definitely have to make sure i choose the right subject.  This paper gives a very graphic look, almost like a charcoal sketch that could look horrendous with the wrong negative.  It's definitely going to take some experimenting to get the best from it.


Wednesday, 6 March 2013

A Slightly Delayed Wedding

  Now i'm no real fan of digital cameras but it does have its uses.  For example-weddings.  Weddings are a massive pain at the best of times, let alone when you add to pressure of photographing them.  Fortunately that's not really something i'm into.  My wife, however, is another matter.  She loves to shoot portraits so when she was asked to shoot a friends wedding she jumped at the chance.  I decided to play at being a second shooter using my trusty Bronica SQ-A and some Tri-X 400.

  The day went really well and everyone had a great time.  Jess got some great photos (and proceeded to spend the next 3 months editing them) and it was nice for me to try something a little different. 

  I developed the films in Rodinal and (as seems to be the norm for me these days) I lith printed a few onto some Orwo BN118.  Here's the three best that I made:


    Jess did a great job with her digital shots as can be seen here (and if you desire a well-priced and very talented photographer for your wedding just drop her an email).

  All in all it was a good day enjoyed by all, and its always nice to see a friend get married.
  
P.S.-Yes that is me in the band that you can see on Jess' blog...