Showing posts with label beach. Show all posts

Monday, 6 January 2014

Surprisingly Pleasing Surprises


  Most of the time when I go into the darkroom I have a pretty good idea of what I want to achieve.  This isn’t really due to any forward planning or meditation, I just can’t get in there as much as I would like and so I tend to have a few days between sessions where I can be thinking about what I want to do with certain negatives.  So when I went into the darkroom last week I knew what I wanted to do with my latest negative.

  I had taken Ellie (our dog) for a walk on the beach with Jess earlier in the week.  The tide was out so there were small pools everywhere filled with starfish, crabs, shells and seaweed.  As I had a few doggy poo bags in my pocket I decided to fill one with various shells and things from the beach so I could shoot some still life (I hadn’t shot any film in ages and I was starting to get twitchy)!  So I filled my bag, tired out the dog and headed home.

  The next day I setup my new Bronica body (yes, I replaced the broken one at last) on my new tripod, setup some lights and got shooting.  I used the S-36 extension tube to get up nice and close, then added close up filters where necessary.  Side lighting came from a table lamp shining from above and slightly to the right of “the subject”.  I used the auto prism I had received with my new body for exposure as I (shamefully) couldn’t be bothered spot metering it.

  Once done I loaded the film into the tank and mixed up my chemistry.  I developed the Pan F+ for 15 minutes in ID11 1:3, stopped, fixed and washed as usual.  Unfortunately the negative came out very thin indeed.  I’m assuming the developer stock solution had expired as I mixed it up about a month and a half ago, but maybe the auto metering wasn’t up to scratch; I don’t see why though as it was a very low contrast scene.  I don’t really use ID11 so that’s my excuse, I should have just stuck to Rodinal but I didn’t want to waste chemistry.  That’ll teach me!

  So, with dry negative in hand I entered the darkroom.  I started, as usual, by making a contact sheet; I’ve been doing that a lot more lately as it’s a good practice to get into.  I could see from that that there were only two or three frames I liked enough to print so I loaded the first and made a test strip.  After fiddling with contrast filters and exposure times I settled on Grade 4 at 4.00 seconds on Kentmere VC Select.  That’s a tiny amount of exposure.  Normally my base exposures are in the 18 seconds mark at grade 3, so you can see just how thin the negative was!  Fortunately, for this frame, all the detail I wanted was recorded on the negative.

  What I had planned for this negative was some second pass lith. If you’re not familiar with it please see here.  Basically you overexpose a print, bleach it back as far as you like then put it into lith developer.  So, I made my overexposed base print as described above:

 Then I bleached it back until the border shadows were just starting to be affected:

   Then I redeveloped in lith, stopped and fixed as normal.  What I found interesting is that the print did not redevelop as much as I thought it would.  Theoretically the print should just keep developing until it is all black, but this print didn’t and I’m not too sure why.  I haven’t really done much experimentation with second pass lith, I really should devote more time to it. 

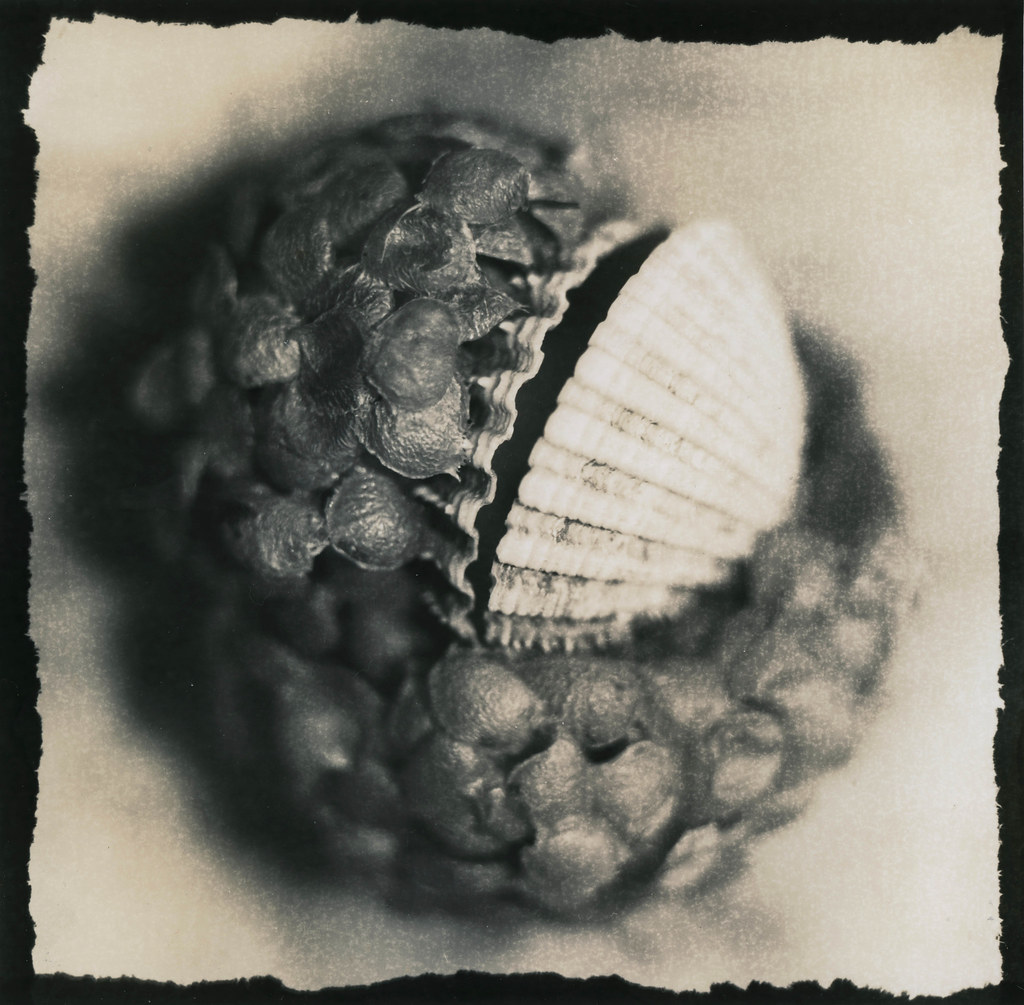
  So here is the final print.  Note I didn’t get the usual greys and pinks with this paper, but a paler grey and some yellowy highlights which, although unexpected, are still pleasing to the eye:


  So what do we learn?  Sometimes what you plan isn’t what you get.  Often something surprising can happen, and often that surprise is something good.

Monday, 16 September 2013

No, No, No, No, NO, NO, NOOOO!!!


  I went out shooting at the weekend.  Which turned out to be a very bad idea.  A very very bad idea.  I discovered last week that a section of coastline not far from me had lots of wooden coastal protection.  Coastal protection = photographers delight so I decided to head out there on Saturday (along with Jess who, as it was sunny, decided to leave the house).  We had a lovely walk but alas it was too sunny and I only shot two frames.  The tide was a little too far out as well so there wasn’t really much to photograph as I was in a long exposure mood.

  I decided to head back at sunrise the next morning when the light would be a bit flatter and the tide would be all the way in.  I woke up Sunday morning wide awake, grabbed my gear and shot out of the house.  Half an hour later I was parked up and walking through the dunes, it was drizzling a little but I thought I’d endure, I could always run back to the car if conditions got worse.  I setup and shot 5 or so frames, keeping my eye on the tide as it turned out I had arrived just before high tide so the water was coming in fast.

  On the 8th or so frame as I was setting up the water came shooting in up the side of one of the coastal protection barriers and headed straight for my bag.  I ran back and snatched up my bag only to turn and see my camera ditch sideways into the sand. ARGH!  I ran back and up-righted the tripod to find my camera encased in grit.  I dusted it off and re-seated the tripod just as the tide came sweeping in again and half inundated my camera bag. ARGH AGAIN!  I ran back, rescued the bag and moved it further inland just as my tripod decided to blow over again and ditch my camera into the sea. 
AAARRGGHHHH!!  I ran back, rescued the camera and ran inland.  Well, the water had washed off the sand which was nice but water and cameras are never a good mix.  Fortunately there are very few electronics in my Bronica.  I grabbed my gear and decided to head home.  I split my SLR kit up and put it on the passenger seat of the car with the air blowers on full.

  When I got home I used a brush to dust off as much sand as I could and left the gear to dry.  It’s still drying now and every few hours I dust off any loose sand.  Handily the squeak on my 80mm lens has disappeared but alas my 50mm makes a horrible grinding noise when focusing.  It looks like no water got into the camera body or the film back which is a bonus; it’s just the 50mm lens that seems to have taken most of the damage.  Ill dry it and clean it as best I can but time will tell if any salt remains inside to cause any damage. 

  I decided to develop my film using PMK Pyro, praying that it would have some good shots on.  Alas, on removing the film from the tank it was almost transparent.  I’m not sure what happened, it looks like it didn’t develop fully.  My guess is the Pyro was dead as it was a very old stock solution, but I can’t be sure.  So now I am left with a potentially knackered camera and no pictures to show for it.  Damn.

But here’s what I learnt from my day of tragedy:


  1. heavy tripods are a wise investment
  2. sand and seawater do not compliment camera gear
  3. PMK Pyro solutions need to be used up quickly
  4. incoming tides move in rapidly
  5. cameras take a long time to dry out
  6. hats are useful for covering lenses
  7. it is hard to keep filters sand and water free when it is raining and you're on a beach


Hopefully you will learn a lesson from this tale of woe.  Keep your gear dry and avoid wet and windy beaches.  Right, message sent - i'm off tripod shopping...
 

Monday, 17 June 2013

Sometimes a Joy, Sometimes a Trial

  I printed this at the weekend and it was a huge pain in the bum to do!

  I went through at least 20 sheets of paper trying to get the contrast and exposure right.  I had to keep swapping frames on my negative due to dust and hair that were in the emulsion - the whole printing process was just a pain.  Sometimes printing is a joy, sometimes a trial.

  Even the toning didn't go as planned.  I wanted to try something i read in the Tim Rudman toning book that i recently acquired.  You blue tone the print to completion, rinse then put it into selenium toner.  The selenium replaces the blue in the highlights which turn a putty colour.  If you rinse again and put the print back into blue toner then the blue will shift to a bright azure blue.  Guess what...it didn't work.  The selenium stripped all the blue back off the print (apart from a slight hint of purple in the shadows).  It seems only some blue toners work well for this.

  In the end i split toned in sepia and blue to get the above final image.  I really don't know if i like it or not.  But i guess each session in the darkroom is a lesson, sometimes a hard one.

Thursday, 28 July 2011

The Sun on the Beach

  After a grim day at work i decided to cheer my wife up by taking an impromptu trip to St Anne's Beach near Blackpool.  Quite conveniently i had just been delivered a box of film a few days earlier and decided to make the most of this opportunity to shoot a roll.  We loaded up the car and half an hour laer we were stood on the shore.

  Those who have been to this part of the coast will understand that sometimes its quite a walk before you actually get to the sea.  Off we set anyway and in twenty minutes or so we were within spitting distance of the waves.  We found a spot we liked and dropped our gear.  With forty-five minutes or so to kill before the sun truly set we spent some time spying out some angles to shoot from and playing 2-person tig.  Its amazing how entertaining jumping over puddles and running on the beach can be!

  Unfortunately the sunset wasnt as epic as we had hoped as some clouds set in, blocking a lot of the light.  Still, we shot what we could and then called it a night.  But thats the good thing about sunsets, each one is different; i anticipate a return soon to capture the next one.