Monday, 16 June 2014

A Break From the Norm

  By now you're probably fed up of seeing me post landscape after landscape.  I'm sorry but that's pretty much all i've been shooting lately.  Not even a shipwreck has crossed my path in the last couple of rolls i've shot.  I did, however, shoot a test roll when my wife got her new Pentax 67 (yes, i have converted her from digital - jackpot)!  There was one frame on it that i decided would potentially look good lithed. 

  So, i loaded up the enlarger, focused, chose some ancient Foma Neobrom 211N paper and set about making a test strip.  Imagine my surprise when the print actually developed well.  This paper is old.  Really old.  It's in a paper packet and even the lightproof sleeve is paper!  Surprising, then that it developed so well.  In fact, it developed so well i decided not to lith it and just make a straight print.  Fortunately the paper i had was the right grade (2 i think) and so i chose an exposure, burned each edge for 1 stop extra to provide a nice border and developed in Ethol LPD 1:4.  The keen-eyed among you may note that this is a cold tone paper and i'm developing it in warm tone developer.  Deliberate!  The final print gave of a lovely sharp silvery tone which was a delight to behold (until i obliterated it with toner that is).  As always my hand ended up reaching for the selenium toner.  I gave it a few minutes in 1:5 toner until it started taking on a warm brown tone, then i slipped it into some bleach (after a wash of course) and gave it a slight sepia hit in the highlights.  This resulted in the final print:

  Yes - rectangular, not square!  It's not one of my greatest images but i think it's ok.  Sometimes it's nice just to be able to blast out a quick print without having to go round and round sheet after sheet after sheet of paper (speaking of which - i have a post coming up soon which covers an absolute demon of a print).

  So what do we learn?  Sometimes it's nice to print something simple and easy to give yourself a confidence boost and to get those juices flowing again!

Tuesday, 10 June 2014

The Thoughtful Cliff

  So despite saying in my previous post that i was going to update more i haven't updated in over two weeks!  Sorry!  But, good news - i have made my first print from my recent holiday to the north east coast of England, and here it be:

  I shot this on a very sunny day in the town of Saltburn.  It is printed onto Ilford MGIV FB Warmtone paper using Ethol LPD diluted 1:4 and toned using selenium 1:9 and a bit of sepia.  This is my first time using a non-neutral developer and i have to say i loved it.  If you are unfamiliar with LPD it is a wonderful developer which allows you to change tonality (not contrast) using dilution e.g. use it 1:1 for cool tones and around 1:4 for warmer tones (obviously tonality will depend very much on the paper you are using too). 

I like to think of the clouds as little thought bubbles coming out of the cliff. 
  I'm pretty pleased with this print, i really feel like i am starting to get into a rhythm and personal style with my printing.

  I made this print using the split grade printing technique, as i have done with so many others.  I did a soft exposure test strip, selected the best exposure for highlights (remembering to go a bit heavy as the sepia toning i had planned would lose a little highlight detail), then i did a hard exposure test strip and selected the best exposure for that (again, taking into account the added density that selenium toning would yield).  It's always good to have a good think about toning either before printing or during proofing so that you can account for any lost/added density that may result form the toners you use (that reminds me - i should really do a few tutorials covering toning).   I knew with this print that i wanted a selenium/sepia split so i deliberately overexposed the highlights and very slightly underexposed the shadows.

  So, after making a base print of my combined soft and hard exposures it was time to think about dodging and burning.  The cliff was looking pretty blocked up so i did a bit of a burn on the soft exposure and a dodge on the hard exposure - this evened out the contrast a little whilst maintaining the "pop" of the cliff.  Then i did a very slight hard exposure burn on the sky to add a little extra depth to the clouds (the use of a grad filter at the time of exposure had already helped darken the sky to a pleasing tone).  Then i did a bit of an edge burn around the sides and base of the print to draw the eye into the centre (i did this on both the soft and hard exposure).  I think this really works on the base of the print as if the sand was all the same mid tone the eye would be drawn off the bottom of the image.

  To finish off the print i did some very very light bleaching (followed by a fix) of the cloud highlights and the band of light across the sand (i used potassium ferricyanide/potassium bromide bleach from a sepia kit diluted 1:9).  This helped add a bit more "pop" to the highlights but i had to be carfeul that this combined with sepia toning would not cause any highlight detail to be lost.

  After a good wash (in my newly constructed print washer) i bleached back the print until the upper midtones were just starting to be affected and then toned in standard sepia toner.  After a quick wash i then transferred the print into selenium toner mixed 1:5 for a few minutes which added a nice dark purplish hue to the print.  I then did a final wash and left the print to dry before scanning.

  I'm really pleased with how this print turned out and i am loving Ethol LPD as a print developer.  I'm going to try some coldtone papers with it soon and a stronger dilution and see what effects i can get.  In the meantime i've still got plenty more frames to be printing from my trip away.

  I hope some of you have found this post useful and, as always, keep printing.

Wednesday, 21 May 2014

How To: Make a Print Washer on a Budget

  Ah the early stirs of summer, the time when a man decides to re-open his toolbox and turns his mind to possibility.

  I'm tired of washing my prints in the kitchen sink.  It's just too small and i can't leave it alone because the prints sink to the bottom, block the tap; the sink fills and my kitchen starts to flood.  And woe betide me if i decide to print some 12 x 16 paper!


  Suffering from the same problem?  Lo, read on to see how you can make an inexpensive (really, it cost me about £20 in total) print washer.

  First off, materials.  Here's what you will need:

        • Plastic storage container (any size you like),
        • 2 x 2 metre lengths of plastic waste pipe (any diameter you fancy),
        • Some 90 degree joints that will fit your pipe (get about 8),
        • Hosing/tubing (approximately 2 metres),
        • Drill
        • Saw
        • sandpaper
        • Glue gun/silicon sealant
 So how do we build this washer i hear you cry?  Keep reading:

Step 1

  Grab your storage box (mine cost about £11 and can easily fit in 12 x 16 prints) and drill 2 holes roughly the same diameter as your waste pipe just an inch or so below the top of the container towards the left and right hand side.  To do this you may have to use a hole cutter (its like a round saw which you mount on your drill).  Unfortunately i didn't have a hole cutter the right size so i drilled my holes bigger.

Step 2

  Cut a small section off your pipe and feed it through the hole on your nearest side, push on a 90 degree joint (making sure you sandpaper down the edge you have just sawed) and then attach a vertical section of pipe which extends just shy of the base of the container.

Step3

   Now do exactly the same with the other hole, but this time saw the tip of the pipe at about 45 degrees to get a spout.


Step4

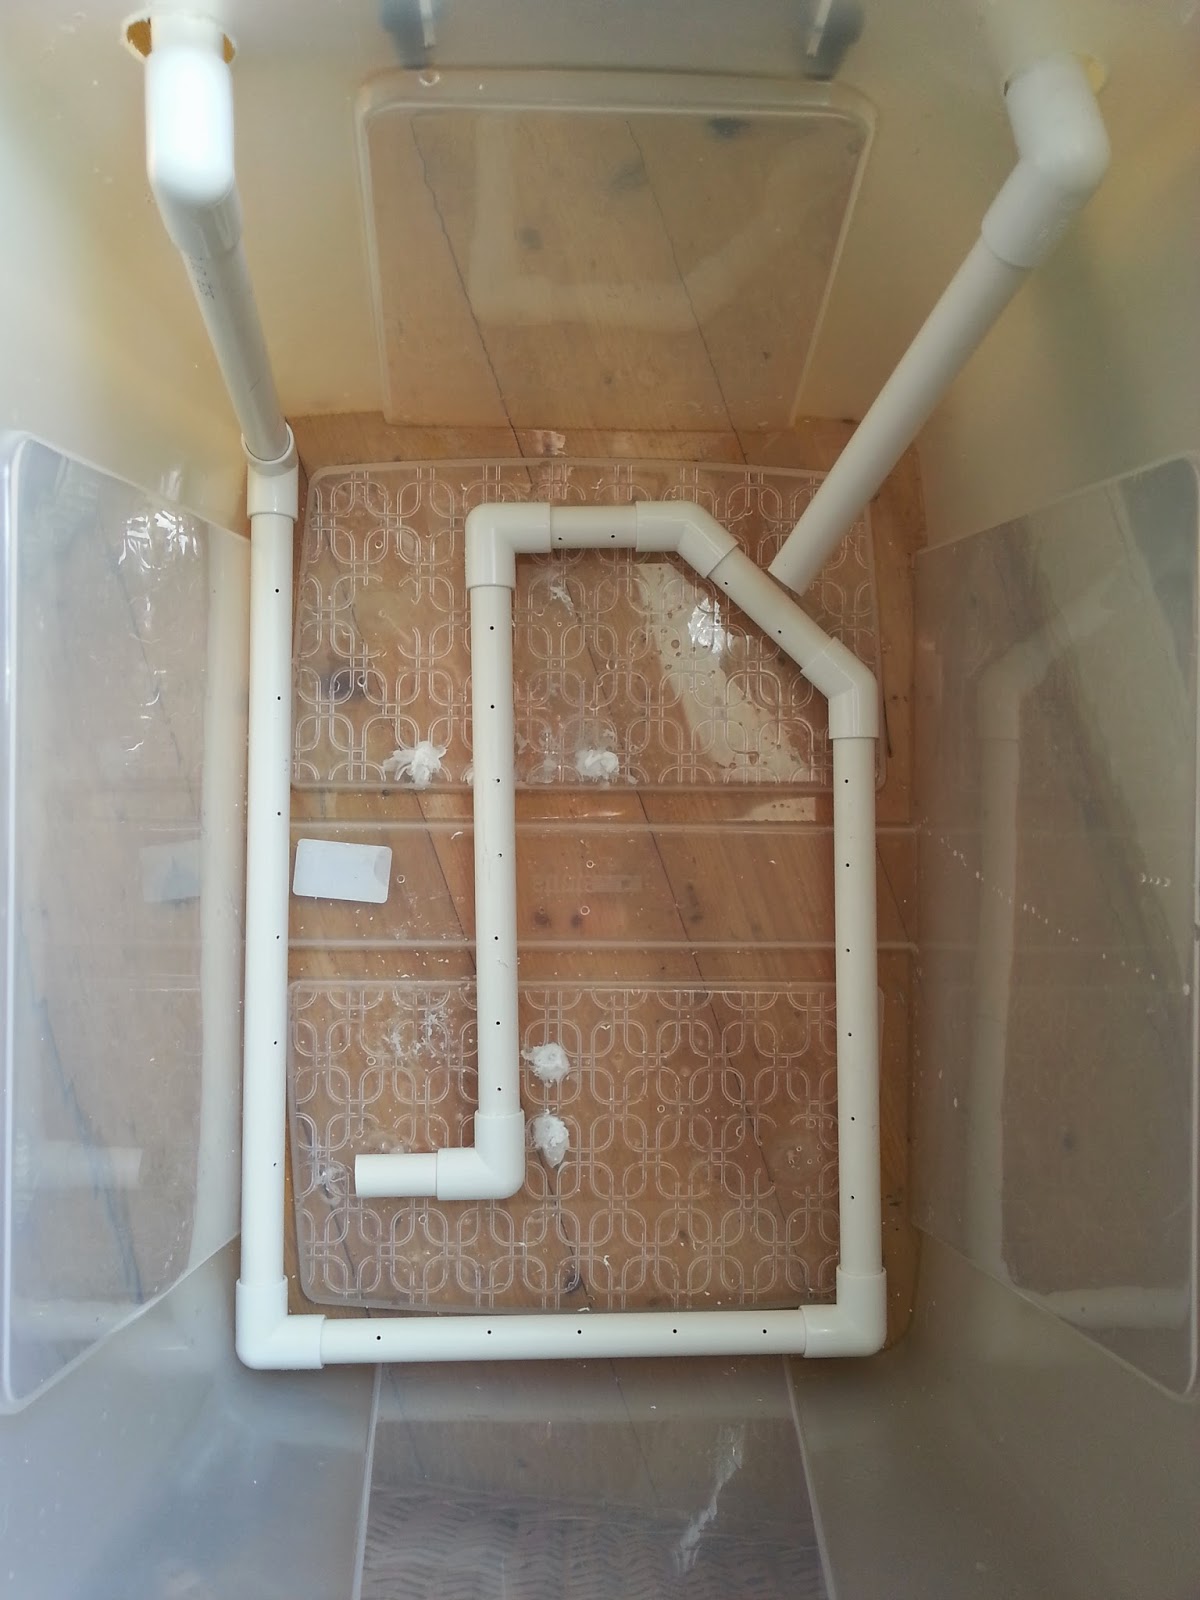
  Now go back to your first length of piping and measure along the base of your container then cut a length of pipe just a little less than the length you measured.  Smooth off the sawed edges of the pipe with sandpaper and attach it to the pipe you already have.

  At this stage i tried attaching a length of hose to cover the base of the container but it didn't quite work out.  Instead, keep attaching lengths of pipe and joints until you get good all round coverage along the base of the container.  You dont need to cap off the last piece, this will serve as an outlet for the water which flows through the system.

Not like this!

Like this!
Step 5

  Now take your drill and (using a small drill bit) drill holes every 2 inches or so apart along the entire length of the tubing which is sat in the base of the container.

Step 6

  Retreat to the bathroom (or wherever you're planning on setting up this washer) and check out your taps.  If you have the kind of taps you can just push hosing onto then all well and good, connect a length of hosing from the first piece of piping onto your taps.  This will mean water will flow in, down the vertical length and through the loop you have made in the base of your tub; flowing out from the last length to be picked up by the second vertical pipe which will act as a siphon.

  Now, my taps are mixers which means i cant push any hosing over them.  But, i can unscrew the shower and push the hosing onto the screw attachment (yay).

Like so!
Step 6

  Attach a length of hosing onto the second pipe and point it plugwards.  Turn your tap on and you should see water spurting out through the holes you have drilled and the container will start to fill.

  You should see some good agitation in the water as the container starts to fill (which is exciting isn't it).

Step 7

  Now, remember i drilled my holes for the pipe inlets bigger than the pipe?  I'm going to need to seal that up.  Take some plastic (e.g. from a bottle) and cut out a square which more than covers the holes you cut.  Cut out a hole as close to the diameter of the pipe as possible and use a glue gun or some silicon to attach the plastic to the container, with the pipe running through it.  If you don't do this then the water will just leak out of the holes you made and the second pipe won't act as a siphon.

Step 8

  Once that's all done you will have to ma the tap for a while to get the right flow.  Keep adjusting the amount of water coming out of the tap until what's going in matches what's heading out of the second pipe.  It helps to drill a small hole in the top of the second pipe and stick a match in it.  The match can be used to increase and decrease outflow.  Preferably you don't want the water to flow out over the top of the container.

Step 9

  The final step is to make something to support your prints.  It should be easy enough to source some acrylic or perspex sheets, cut them to size, attach them to some rods and put that in the tank.  As i already have a Paterson drying rack, however, i decided to use that.  These are cheap and come up relatively often on Ebay.


  And that's about it.  It's not the most hi-tech thing ever created but it's cheap and cheerful and should wash your prints sufficiently (i can't guarantee that of course).  It's certainly better than flooding my kitchen!

  The way it works is that the water flows in and goes through the loop at the base.  The drill holes allow water to spurt out which agitates the water, causing motion around the prints.  The water picks up the fixer and, as fixer-laden water is denser than clean water, it sinks to the bottom of the container.  It should then be picked up by the outflow pipe and siphoned out down the drain.  Science!  I haven't technically finished mine yet as i haven't sealed up the original drill holes so my siphon isn't really working but it will.  IT WILL I SAY!  Just for fun, here's a super-entertaining video of mine showing this mega-agitating washer in action (caution: may cause your mind to blow, it's that exciting):


  So that's it.  A print washer for those of us on a budget.  Those hundreds of pounds you have now just saved can go on something better like film, paper, chemicals or (woe of woes) rent!  As always keep printing and ill see you again soon.


Tuesday, 13 May 2014

Back on it!

  I don't know what's more shocking - the fact that a) I am actually writing a blog post, or b) that I shot 3 rolls of film whilst away on holiday last week.  I'm lazy, i've come to accept that now but it's not really good enough is it.  I don't shoot a tremendous amount of film because i'm not one of those people who can go out and fill up a roll of film faster than a teenager can go bankrupt in Primark.  I do, however, like to shoot as much as possible when the location and/or composition permits it.  Hence, last week whilst away celebrating my 3 year wedding anniversary I shot 3 rolls along the eastern coast of England in the Whitby/Scarborough/Staithes area (yay for me).  I have hardly shot anything lately due to a potent mix of lack of inspiration and general laziness.  It's all change now though as i have got at least 6 good shots which i want to print (and we all know how I love to print).  Surprisingly most of the shots are even well exposed which is pretty much a first for me, i'm terrible at metering. 

  Even better Jess (my loving wife in case she's reading) got me some Ilford FB Warmtone paper and something I have been coveting for some time - Ethol LPD!  For those who don't know, LPD is a paper developer available in liquid or powdered form with the unique (as far as I am aware) property of being able to change tonality through dilution, i.e. a ratio of 1:1 will give a cool tone to the paper and a ratio of 1:4 warmer tones This obviously depends on the paper being used - you won't get warm tones from a cooltone paper, but you can imagine the possibilities now open to me!  Thus far i have only used neutral developer on all my papers so I am looking forward to playing around with some dilutions and see how toning is affected.  Needless to say I am eager to print (but then again the Lord of the Rings extended edition bluray boxset is keeping me pretty much glued to the TV this week).

  As for this blog, well, i'm determined to update it more often.  I have a few DIY projects in mind including making my own print washer so no doubt I will put that in a tutorial for you all to read and maybe try out for yourselves (if it's successful that is).  Sorry i haven't written much lately but rest assured, i'm back on it with renewed vigour.  In the meantime keep printing (or scanning if that's how you like to live your life) and watch out for some Yorkshire prints coming up on here soon.