Friday 31 May 2013

How To: f-stop Print

  Some can find f-stop printing to be confusing but it really needn't be.  In fact, once you have got your head around the principles behind it it really makes sense.  I mean, we operate our cameras in terms of f-stops, so why don't we do the same when enlarging?  For many doing tests strips in seconds works for them and they are happy with that so fair enough.  I'm just going to present f-stop printing to you and let you make your own choice.

  So what is it?  Basically, instead of exposing test strips and dodging and burning in terms of seconds we do it in terms of f-stops.  This means that should we need to make a larger print at some point in the future we can just adjust the base exposure and maintain the f-stop values instead of having to recalculate each dodge/burn.  It's easier to explain with an f-stop printing chart:


(There is a downloadable spreadsheet version here).

  At first glance this may seem confusing but it is relatively simple to suss out.  Times are given in terms of 1 stop (dark grey), 1/3 of a stop (not quite as dark grey), 1/6 of a stop (light grey) and 1/12 of a stop (mid grey).

  So let's start at the beginning and say you're doing a test strip.  Instead of going from 1-30 seconds for example, using the f-stop chart you could go in steps of 1/3 of a stop so you would go 8.0, 10.1, 12.7, 16.0, 20.2, 25.4, and 32.0 seconds.  What are the advantages of this?  Well, each strip on your test strip will have exactly the same amount of light added to it at each strip (in this case 1/3 of a stop).  If you were to do a strip merely in seconds then you would not get this uniformity.  The f-stop method makes it much easier to pick out your base exposure.

  There are dedicated f-stop timers out there that automate the process for you but they are pricey.  My current timer allows me to input increments of time in 0.1 of a second from 0-9 seconds and the 1.0 seconds thereafter.  This means i have to do a bit of fiddling about to do a test strip but i find it's worth it.

  When it comes to dodging and burning the f-stop printing method is a life saver.  Let's say your base exposure is 18.0 seconds and you want to burn a sky in for 1 full stop extra.  Just look up 18.0 under the B (base exposure) column and move right to the +1 column which says 18.0.  That means to add an extra stop you need to expose for another 18.0 seconds.  +1/2 a stop would be +7.4 seconds and so on.

  This comes in handy when resizing a print.  To make a bigger print the enlarger head needs to be higher.  As the enlarger head is higher exposures will be longer.  So say were taking the same print and were going from 8 x 10 to 9.5 x 12 and our base exposure has gone from 18.0 seconds to 22.6 seconds.  instead of using formulae to try and figure out what our new dodging and burning times would be as we recorded them in terms of seconds, we know that our dodges and burns will stay the same in terms of f-stop.  So if we have a +1/3 of a stop burn at 18.0 seconds base exposure (+4.7 seconds) at our new base exposure of 22.6 seconds this becomes +5.9 seconds.  Follow all your recorded dodging and burning times and voila - the same print but bigger!

  It sounds complicated but re-read this article a few times and you'll get the hang of it.  It really is worthwhile to try out and it may well revolutionise your printing!

Wednesday 29 May 2013

How To: Make a Black & White Print Part IV - Dodging & Burning


  Before i got a darkroom dodging and burning confused the hell out of me!  It’s one of those tools that Photoshop just makes overly complicated when it really is so simple.  Dodging and burning are simple tools used by darkroom workers the get the most out of their negatives and once mastered become second nature.  They can be used to simply balance out a print or they can be used creatively t change the mood of a print entirely.

  You don’t need any special tools to do it.  In this this article i showed how you can make your own tools for a meagre sum.  Sometimes all you need is a rectangular piece of cardboard, sometimes a more complicated shape, 

  First off – what is it?  Well think about the light from your enlarger hitting your paper for a second.  If you were to block its path then less light would hit the paper ergo your print would be lighter, if you were to add extra light then your print would be darker.  That’s the basic principle of dodging and burning – blocking light is a dodge, adding light is a burn. 

  When dodging and burning it’s important to make sure that you keep your card/tool moving.  Why?  If you keep it still then once your print is developed you will see the outline of it on your paper which is obviously no good!  By keeping the tool moving you reduce the edge effect it produces.  This is also effected by how close you hold your tool to the paper.  Turn your enlarger on and try moving your tool up and down in the light path.  You’ll note that the closer the tool is to your print, the sharper its edges are and the smaller the area it covers; the closer to your light source the more blurred the edges and the larger the area it effects.  It’s good to practice dodging and burning on some old paper, experimenting with where you place your tool in the light path and how much you move it.  As with many things in the darkroom it takes practice to get used to.

Simple Dodging & Burning

  Let’s now look at a few practical examples of using dodging and burning from the simple to the complex.

  We'll take this print as our first example:

   To be honest it's a scan from a negative but we can still apply the principles.  There is a good overall balance across the image but two areas could use a little extra work - the floor where the sun is coming in is too bright and the roof directly above is too dark.  The floor needs a burn and the roof needs a dodge.  Look at the test strip you made when you created your print - find where you choose your base exposure and then look either side for which time gives you the best exposure for the roof and floor.  

  Let's say for example that my base exposure for this print was 18 seconds.  I look at my test strip and estimate that 22 seconds will give me the best exposure for the floor, while 15 seconds gives me the exposure i want on the roof.  i prepare my tools (probably a disc on a wire for the roof and a piece of card with a hole in for the floor) and set my enlarger running for 18 seconds.  When 3 seconds remain i place my tool in the path of the light so that it blocks off the roof area i want to dodge and keep it in constant motion.  Next i set my enlarger to run for and extra 4 seconds so that i can burn in the floor.  I set my enlarger running and let the light pass through the hole in the card onto the floor.  Develop the print and voila!  

  Let's now take a look at this print.  It's not the best print in the world but it will demonstrate dodging and burning nicely.  When i produced a flat print from one base exposure there were a few areas which needed attention.  Firstly, the grassy floor was too light, secondly the dark tree area in the top right was too light and blended too much with the tree in the foreground.  Both of these areas clearly needed burning in.  For the floor the long edge of a piece of card was perfect.  I dialed in a few extra seconds on the enlarger and used the card to shade the rest of the print - keeping it in constant motion and holding it about halfway between the paper and the enlarger, thereby making sure the edge of the card wasn't too clearly defined.  Next i did the same for the top right area of the print but used a flexible placemat which i could fold into a nice "u" shape.  These burns enabled me to darken the areas of the print that were taking attention away from the main subject.

Let's Get More Complex

  So far we have looked at using simple dodging and burning to balance out a print and keep focus on the main subject.  But as i mentioned earlier, dodging and burning can also be used creatively to change to mood of a print entirely.  This is where your personality comes into play.  If we gave the same negative to ten different people you would get 10 different prints because each individual would have a different idea of how they wanted to present the image.  Dodging and burning allow you to get onto paper what you saw in your head at the time of camera exposure.  Let's take my latest print as an example:


  Obviously that is not what the scene originally looked like when i tripped the shutter.  A straight print from this negative resulted in a very flat print.  The sky was very pale grey with little cloud definition, the grassy foreground was a uniform mid grey, and the sky beneath the clouds just melted into the horizon.  The get to from this flat print to the final print i saw in my mind when i exposed the film was going to take a lot of work. 

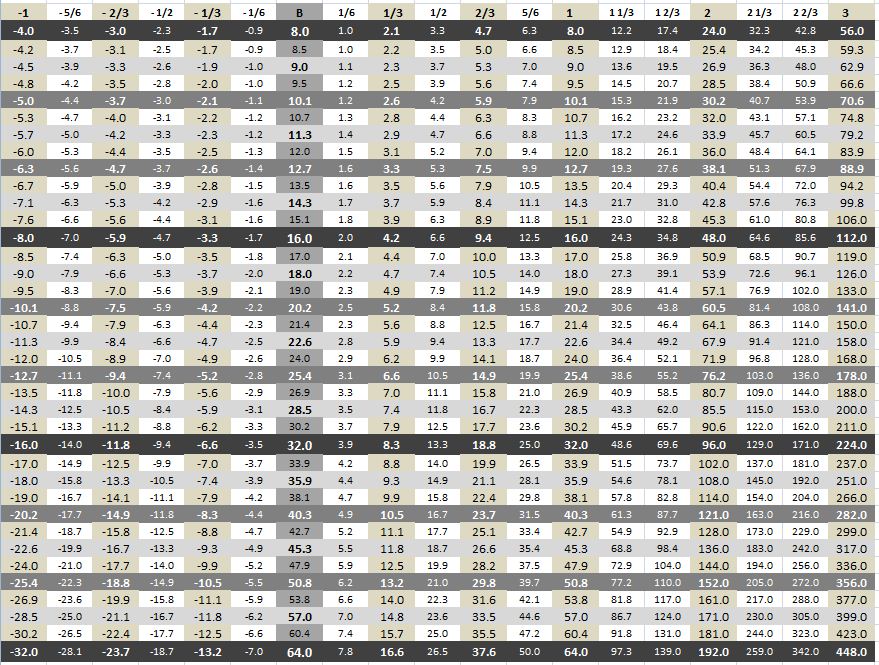
  I set my enlarger filters at grade 3 which gave me the contrast i wanted on the wood and i chose my base exposure time of 18 seconds (for an 8 x 8 print).  I used the test strips i had created to determine the exposures i wanted for the rest of the image and planned out my dodges and burns.  It is good to write down the dodges and burns you plan out both for future reference and ease of workflow while you are printing.  Here's a copy of my notes on which you can see my dodging and burning map: 

   You'll note that the dodges and burns are expressed in terms of f-stops not seconds.  That's because i have recently adopted the f-stop method of printing (more on that later).  For the sake of continuity i will talk about these dodge and burns in terms of seconds.

  The first box shows i dodged the sky.  This is because i wanted whiter clouds on a dark sky in my final print.  So, i used the edge of a piece of card to move gently up and down the sky dodging it for 9 seconds.  Next i turned my attention to the foreground.  I wanted that to be dark, moving the viewers eye towards the centre of the frame.  I used my trusty flexible placemat in a "u" shape again to add 4 seconds extra light to the right side and 8 seconds to the left (this balanced it out as in the flat print the left side was much lighter).  Next i added 18 more seconds to the very top of the sky which would significantly darken it and start to create a nice graded effect.  Then i did an edge burn all the way around the print, 4 seconds on each edge.  This slightly darkens all the edges which i feel adds a nice balance to a print and keeps the eye focused on the main subject matter.

  Now, we come to something we haven't mentioned yet.  Multigrade dodging and burning.  If you remember the article where we discussed split grade printing we talked about how grade 00 and 0 are very low contrast and so only really affect the highlights of an image.  On the reverse, grades 4 1/2 and 5 are very high contrast and so only really affect the shadows.  We can use this principle when it comes to dodging and burning.  If we have areas in our print we want to darken but want to preserve shadow detail we can use a soft grade.  This will darken highlights but leave your shadows untouched.  Likewise if we have an area in our print we want to darken without affecting our highlights we can use a hard grade.

  In the example of the print we are discussing i switched from grade 3 to grade 0.  I then used a piece of card with a thin rectangle cut out to burn in a little highlight detail of the pale grass just below the horizon.  On the flat print there was very little detail in this grass and i wanted to bring some of that back.  Had i merely added more time to the base exposure this would have effected the rest of the print.  Burning in at grade 0 allowed me to preserve the rest of the print as i wanted it and bring back some of that highlight detail.

  Next i switched to grade 4 1/2 and burnt in the sky.  This would leave my clouds unaffected but add greater density to the sky.  This burn combined with the previous dodging and burning i had done created a nice gradational effect to the sky but preserved cloud detail.

  As can be seen from my notes i did a little local bleaching and then toned the print - more on that at a later date im sure!

  So, hopefully that's helped some of you out with expanding your darkroom experience.  Have fun printing and as always feel free to get in touch with any questions.

Tuesday 28 May 2013

Lithing a Wedding


  As alluded to in my previous post i recently took some photos at a friends wedding.  Jess had been grabbed last minute to do the official photos when the hired photographer broke his ankle on the stag do, so i got roped in to help her out.  I don’t mind doing it but i wouldn’t like to shoot a whole wedding on my own!  I took along my Bronica SQ-A kit as usual but decided to also bring my new charity shop acquired Yashica FR-1 because it has TTL metering so i could just point and shoot away throughout the day and save the Bronica film for more ‘special’ shots.  
  The day went well overall although the weather was a bit naff;  cold, wet and grey  so Jess didn’t have long to get in the photos she needed before everyone ran back inside.  I mostly just used my Bronica in the service during the talk and then the vows because i knew that Kodak Tri-X in Rodinal would give a nice look to the photos.  The Yashica i took outside and loaded with some Ilford Delta 400 which i got given when i bought my darkroom kit.  Im not very experienced in Delta type films and had heard bad things about tghem in Rodinal, but to be honest i couldn’t be bothered mixing up any PMK Pyro when it came to development.  I shot it at box speed and developed.  Being unused to 35mm as i only shoot 120 film the grain took me by surprise.  I knew i wouldn’t be making any massive prints from this film!  As Keith (the groom) had told me he liked the lith photos i have been uploading to my social networks lately i decided to lith one of the better frames from the roll.  I recently won some Fotospeed Lith paper (now discontinued) on EBay so i decided to use a sheet of that with some LD20.  It worked really well and i like the final result:


  This paper responded really well to selenium toning – starting off very yellow before shifting to pinkish red, then plum, then to this cooler blue.  I may experiment with just leaving it in selenium for half an hour or so and documenting the colours you can get.
  I haven’t really touched any of the wedding pictures from the Bronica roll yet as i have been focused on the marsh print (see previous post) but ill hopefully get chance to have a little play later in the week sometime.

Monday 27 May 2013

A Bank Holiday with Eddie

  Finally at last i got a decent session in my darkroom.  As many of you will know today is bank holiday Monday here in the UK.  Basically that means that everywhere is shut and everyone is out mowing their lawns and washing their cars.  Well they would be if it wasn't raining for a change.

  As Jess works at a hotel she doesn't have the day off so i dropped her off at 7 this morning and then headed straight into the shed to start printing.  Now, i recently shot a friends wedding on film and had a few frames left over which i went on to use on the coast at Lytham.  I decided to print one of the shots from that roll which i  really thought would let me get creative.  You see, i've been very inspired lately to give my printing skills a boost.  The book 'Creative Elements' by Eddie Ephraums is to blame entirely.  I saw it sitting on a shelf in a used bookstore and had a thumb through.  It looked interesting enough so i bought it and ever since i've been dying to have a good go at some negatives.  If you're into darkroom work i highly recommend you get this book.  In it Ephraums basically goes over ten or so of his shots and explains in detail how he got from camera setup to final print.  You know those shots you take and when you print them they just look dull and uninteresting?  Prepare to be inspired to dig them out again!  That's all i'm saying for now - if you want to know more then get the book!

  So, i decided to try and apply some of the things i had learnt from Ephraums' book to the negative i was planning on printing.  A straight print from the negative is just a bit...well...meh.  it's nothing special, very grey and flat.  Considerable dodging and burning was going to be required to get on paper what i saw in my head at the time of exposure.

  To start with i did a test strip (i should note that i have started using the f-stop printing method and i find it so much easier than dodging and burning by time - i'll be using this method from now on i think) and chose 18 seconds as the correct overall exposure time.  This gave me the tonality i wanted in the wood, which is the most important part of the picture.  The highlights were spot on where i wanted them but the shadows were weak, even though they had good detail.  I decided to step up from grade 2 to grade 3 to give the shadows a kick, even though it would mean a little loss of detail in the shadows.  I kept the exposure time the same and after processing the paper i was happy with the final result.

  Now came the fun of trying to realise the print i wanted.  I ended up using a lot of trial and error (and paper!) trying to get the sky how i wanted and getting the foreground nicely burned in etc.  You can see what i finally decided upon in my notes below:

  I spent ages working on the sky and couldn't get white clouds on darker sky until i realised that the sky was getting a hefty bit of exposure at grade 3 in the base exposure (sometimes it's just the obvious things that elude you for ages).  So, during the base exposure i dodged the sky for 1 stop (9 seconds) to ensure the clouds would be quite white ready for burning in later.  Next i focused on the foreground as i wanted it to be a lot darker, leading the eye towards the centre of the picture.  The right hand side got +1/3 of a stop (+4.7s) and the left hand side got +2/3 (2 exposures of 4.7s).  The very top of the sky then got +1/2 a stop (still at grade 3) to darken it slightly ready for building on later.  All edges were then given a +1/3 of a stop burn to darken them slightly and gently push the eye towards the centre of the frame.  I then switched to grade 0 to burn in the long white grass along the horizon and part of the foreground.  Had i merely extended the base exposure this would have affected the tonality of the wood which i wanted to maintain as it was.  Grade 0 would burn in a little highlight detail without affecting the shadows.  I decided that +1/3 of a stop would suffice to bring those highlights down.  Next i switched to grade 4 1/2 to burn in the sky and clouds.  I did several small passes up and down the sky with a piece of card during the +1/2 stop exposure.  This gave a gradational burn to the sky and enhanced cloud separation which is exactly what i wanted.  Finally i used a little bleach from a toning kit to paint over the sky just above the horizon.  It was very grey and kind of melted into the clouds above.  Lightly bleaching (with diluted bleach) separated this sky from the clouds above and the horizon line below.  It's easy to get carried away bleaching as i found out on a previous print - i had to go back and reprint it all.  Keep water nearby to wash the bleach off!

  After a good washing i bleached the whole print back in potassium ferricyanide/bromide 1:7 for 5:30 whereupon much of the highlight detail in the long grass had disappeared and some of the cloud highlights were starting to go.  I washed again and then sepia toned to completion.  After another wash i toned in selenium for 1:30 which gave the print a little kick.

  Finally after all that work i got this:


  And i'm really really happy with it.  It was so nice to focus in on one print and really work it.  Figuring out the dodges and burns required to get the print in your mind onto the paper beneath the enlarger.  Ephraum's book was invaluable in giving me the kick i needed to get creative.  I'm really looking forward to the prints to come.   have a few projects in mind and i am hoping to apply the new skills i've learnt to those too.

Thursday 2 May 2013

Never Underestimate...

...The power of a charity shop!  I'm a big fan of charity shopping - some people turn their nose up at it but i dont mind owning second hand stuff and if the money i pay for it can help someone else then thats even better.  Lately though charity shops have seemed a bit "dry".  There was a time when you could wander in and pick up great used cameras and darkroom stuff for next to nothing, but it seems that since film has had a sudden resurgence in the past few years, so have charity shop camera sales.  But yesterday i struck gold!

  As some of you may have read i have recently moved house to an area called Kirkham which is just outside Preston.  It's only 20 minutes away from where i used to live but Jess got a good job here and she doesn't drive, plus we were over here 5 times a week anyway so it made sense.  We moved at the weekend and i booked Monday to Wednesday off work (which means i'm back in today unfortunately).  We got our friends and families to help us shift everything over to the new house and then we blasted out most of the unpacking and did a little decorating.

  Yesterday we decided to have a little wander into the village which is literally 1 minute walk away from our new house.  It's quite strange having every shop you need so close to your doorstep.  There's hardware stores, a Morrisons, a greengrocers, cobblers, banks etc; and, of course, charity shops.  We decided to pop into the first one you come to on the high street and lo and behold sat in the display cabinet was this:


  And it came in a camera bag!  All for £20.  Needless to say i bagged it immediately.  As you may know i dont usually shoot 35mm but i thought i may as well get this camera as i have a box of 35mm film i got given when i bought my darkroom and sometimes you just want rectangles instead of squares.  So, whats in the kit i hear you ask?  Well...
  • A Yashica FRI camera body with TTL metering (complete with manuals)
  • A Yashica 50mm f1.9 lens
  • A Yashica 28mm f2.8 lens
  • A Tamron 80-210 CF Telemacro f3.8 lens
  • A Tamron 500mm SP Telemacro lens (with hood)
  • A shutter release
  • Cokin ring adapter with linear polariser
  • A camera bag to keep it all in 
  Not too bad a haul in my opinion.  Im not too sure if the camera or lenses are any good but i cant complain at £20 can i?!  I shot a quick roll of Ilford Delta 100 yesterday afternoon with it and developed it and the negatives look good.  I did a quick scan and got this:

   Focus is a bit off but i think it came out ok.  I hate scanning film though and im sure the darkroom prints will come out way better (once the darkroom is set up).  Speaking of which - although there's no room in the house to create one, Jess wants met o get a shed and convert it.  No doubt that's a project ill be doing a few blog posts about soon enough.  But for now, hit those charity shops!  It may take a while but you'll eventually find something awesome!