
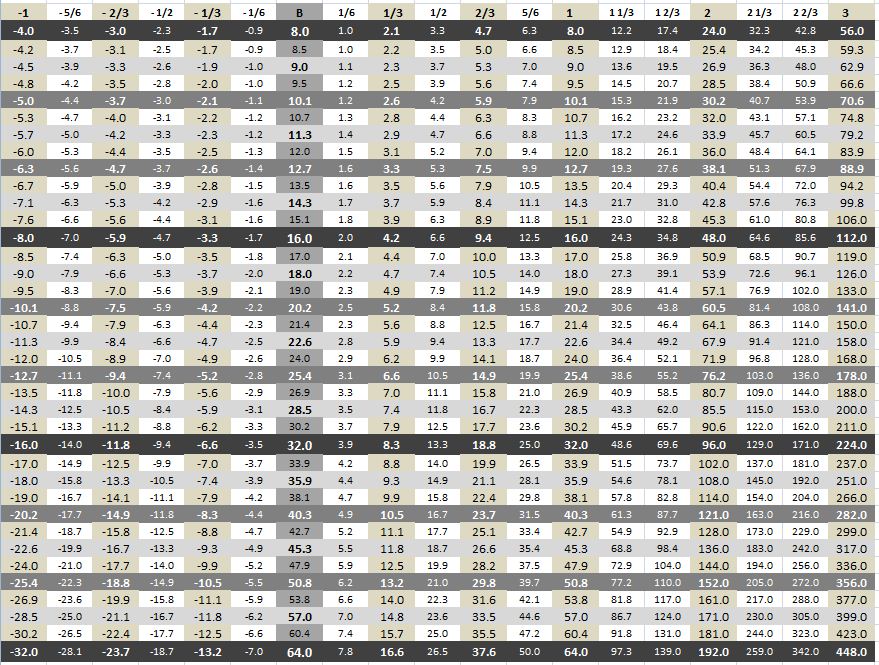
So what is it? Basically, instead of exposing test strips and dodging and burning in terms of seconds we do it in terms of f-stops. This means that should we need to make a larger print at some point in the future we can just adjust the base exposure and maintain the f-stop values instead of having to recalculate each dodge/burn. It's easier to explain with an f-stop printing chart:
(There is a downloadable spreadsheet version here).
At first glance this may seem confusing but it is relatively simple to suss out. Times are given in terms of 1 stop (dark grey), 1/3 of a stop (not quite as dark grey), 1/6 of a stop (light grey) and 1/12 of a stop (mid grey).
So let's start at the beginning and say you're doing a test strip. Instead of going from 1-30 seconds for example, using the f-stop chart you could go in steps of 1/3 of a stop so you would go 8.0, 10.1, 12.7, 16.0, 20.2, 25.4, and 32.0 seconds. What are the advantages of this? Well, each strip on your test strip will have exactly the same amount of light added to it at each strip (in this case 1/3 of a stop). If you were to do a strip merely in seconds then you would not get this uniformity. The f-stop method makes it much easier to pick out your base exposure.
There are dedicated f-stop timers out there that automate the process for you but they are pricey. My current timer allows me to input increments of time in 0.1 of a second from 0-9 seconds and the 1.0 seconds thereafter. This means i have to do a bit of fiddling about to do a test strip but i find it's worth it.
When it comes to dodging and burning the f-stop printing method is a life saver. Let's say your base exposure is 18.0 seconds and you want to burn a sky in for 1 full stop extra. Just look up 18.0 under the B (base exposure) column and move right to the +1 column which says 18.0. That means to add an extra stop you need to expose for another 18.0 seconds. +1/2 a stop would be +7.4 seconds and so on.
This comes in handy when resizing a print. To make a bigger print the enlarger head needs to be higher. As the enlarger head is higher exposures will be longer. So say were taking the same print and were going from 8 x 10 to 9.5 x 12 and our base exposure has gone from 18.0 seconds to 22.6 seconds. instead of using formulae to try and figure out what our new dodging and burning times would be as we recorded them in terms of seconds, we know that our dodges and burns will stay the same in terms of f-stop. So if we have a +1/3 of a stop burn at 18.0 seconds base exposure (+4.7 seconds) at our new base exposure of 22.6 seconds this becomes +5.9 seconds. Follow all your recorded dodging and burning times and voila - the same print but bigger!
It sounds complicated but re-read this article a few times and you'll get the hang of it. It really is worthwhile to try out and it may well revolutionise your printing!
I've seen f-stop printing mentioned and the hype around those expensive timers many, many times around the Internet and I've never bothered to stop to read/figure out what it's all about. I've barely scratched the surface of 'standard printing' and so I've been selective with what I read.
ReplyDeleteYou have a great way of explaining things and having read your post just once I have gone from being totally puzzled to having that "ah ha!" feeling of realisation. What a great method! I can see me adopting this method from the beginning as it makes much more sense. I've also got a timer that does 0.1s so I should be set. Thanks!
yeah once you adopt it and get your head around it it does make more sense. a timer that does 0.1s is invaluable. mine only did 0.1 up to 9.9, then it switched to 1s increments. pain in the butt! its definitely worth getting to grips with.
DeleteAh, come to think of it I think my timer probably does the same; 9.9 and then whole seconds. I haven't used it yet since replacing the Durst Tim 60. I guess you get around it by doing more than one exposure? For 11.8 seconds you'd expose for 11s and then 0.8s - is that how you get around it?
Deleteyeah - its awkward but possible. either that or you can just round up/down to the nearest exposure. or get an f stop timer. there's a guy selling one on apug.org at the moment if you have the £150 asking price. it is possible to do it using the chart in this tutorial though.
DeleteCan't download the spreadsheet version anymore. Can you fix that?
ReplyDelete